Dynamic cloud power control
Dynamic cloud power control is designed for installations with multiple e-Chargers and complex installation schemes, including those that combine various models of V2C charging points. Additionally, it is useful in situations where local dynamic control is limited by the number of charging points.
In such installations, it allows the power to be balanced between the e-Chargers and even with the surplus power from the household or the photovoltaic installation.
Unlike conventional dynamic power control, the brain responsible for performing the operation is not a designated e-Charger but the V2C Cloud servers. In real time, it is capable of making the best decisions to avoid exceeding the total power of the installation, and to integrate photovoltaic energy in the best way to charge… therefore, it is essential that all e-Chargers have an internet connection.
How to perform dynamic cloud power control
It is not necessary to install a meter to balance installations that only have e-Chargers. However, if the installation is connected to an additional structure, such as a building or factory, and you want to balance with that structure, it will be necessary to use the consumption meter supplied by V2C, Enegic, to carry out the balancing.
Enegic
This is a WiFi meter that is easy to install and has four possible inputs, allowing configurations ranging from single-phase to three-phase with photovoltaic energy.
It uses flexible Rogowski coils, available in cable diameters of 36 mm and 100 mm.

Installation of dynamic cloud power control with an additional structure (Building or Factory)
The installation must be carried out by competent and qualified technical personnel, who are fully responsible for complying with existing installation provisions and standards.
Steps for installing the meter
First, open the electrical meter and locate the phases. Generally, L1 is brown, L2 is black, and L3 is grey.

Attach the provided sensors to the corresponding phases.

Next, open the meter by pressing both sides together and lifting the cover.Connect the current sensors to the terminal block. L1 to 1, L2 to 2, and L3 to 3. The red pins go to + and the black pins go to -.


Power the equipment with the provided power supply. Connect the red cable to + and the black cable to -. Remember to protect the line supplying the meter with its corresponding circuit breaker.

Meter configuration in the Enegic App
To configure the meter, once powered on, the blue LED indicator should flash. If it does not, press and hold the button for 10 seconds.
Download the Enegic app from your app store. Create your account, add the device, and follow the instructions to connect it to WiFi.
Add the license. Inside the box, you will find a license with a QR code. You need to add this code in the ‘license’ section under ‘settings’.

The meter can be used both in the mobile app and on the web portal at app.enegic.com. It can also function as a consumption manager if desired for your installation.
Installation design
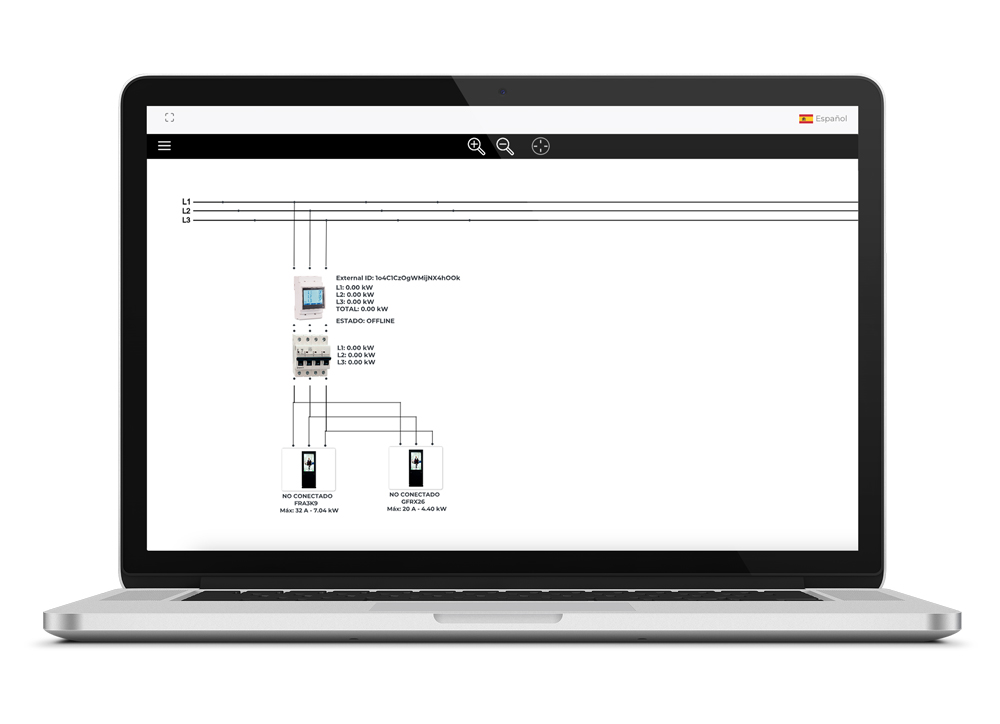
The dynamic cloud power control features a very powerful installation design system. To use it, you simply need to draw your installation design by creating the single-line diagram in the ‘cloud dynamic control’ section. Here, you can easily set all the necessary restrictions.
IMPORTANT NOTE: When drawing the single-line diagram, make sure to place the phases according to how they are in the installation. This will allow the system to correctly perform the dynamic cloud power control.
Log in to v2c.cloud with your account, which must be the same one linked to the e-Chargers. Go to the ‘cloud dynamic control’ section and click on ‘add design’.

Click on the ‘installation’ button and specify the name, country, and maximum available power for the installation.

Draw the installation as it has been set up. If it includes a meter, this should be the first element drawn after the phase lines. The energy meter has a token (external ID).

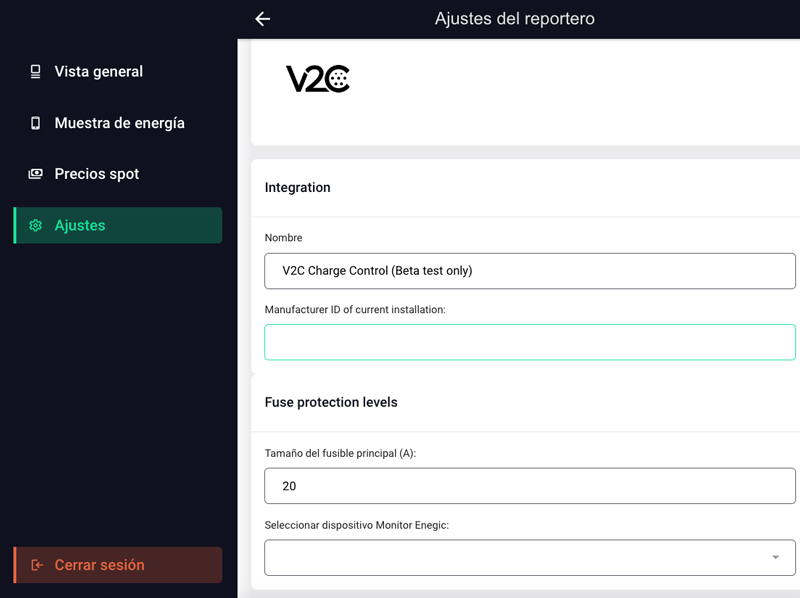
Token configuration on the Enegic platform
You must link the token obtained in the previous step (when adding the meter) in the Enegic meter configuration. Go to app.enegic.com and log in with the account where you paired the energy meter.
Select ‘settings’ from the menu and go to the ‘reporters’ tab. Click on ‘add’, search for V2C, and press the ‘add reporter’ button. You can rename it if you wish.
In the ‘manufacturer id’ section, enter the alphanumeric combination (external ID) and select the corresponding meter. The size of the main fuse is not important. Once configured, press the ‘save changes’ button to save.
The dynamic cloud power control does not function without a circuit breaker in the installation; it is mandatory to have one as it protects the installation.
If the installation has been designed with a simultaneity factor of 1, meaning that all equipment can operate simultaneously without the installation limiting it, it will be necessary to configure the intensity of the main circuit breaker independently of the installation characteristics.

Add the e-Chargers, specifying whether they are single-phase or three-phase, and indicate the maximum intensity at which you want each charging point to operate.

Finally, save the installation. You can now use the dynamic cloud power control.

Viewing the installation
On the main screen of the ‘cloud dynamic control’ menu, select the desired installation and click on the eye icon. This will allow you to view the operation of the installation, including the power levels and the charging points in use.
Do you need technical support?
Submit a request in the Technical Support Centre, and we will contact you as soon as possible to offer the best solution.