
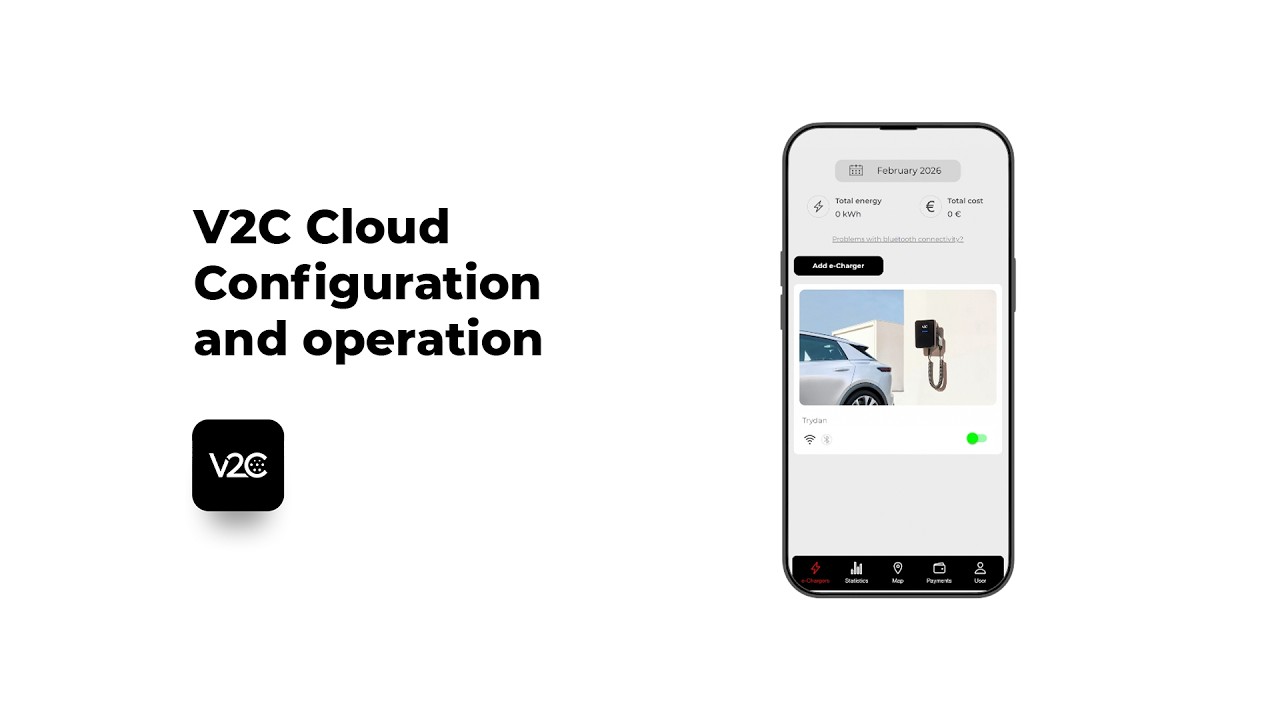
V2C Cloud Configuration
Comfort and control are essential to provide you with the best charging experience for your electric vehicle. That’s why we offer you our V2C Cloud application completely free of charge. This powerful platform gives you full control over your charging sessions and offers you a comprehensive solution to manage your e-Chargers efficiently wherever you are.
- Download V2C Cloud
- Access
- Add an e-Charger
- Bluetooth Connection
- WiFi Connection
- Set the current limits
- Activate and configure dynamic power control
- Customize the charging profiles for dynamic power control
- General Control
- e-Charger Configuration
- Check statistics
- Charging at public chargers
- Payments
- Edit my user profile
- FAQs
- Do you need technical support?
Download V2C Cloud
Download the app from your smartphone’s application store and turn every load into a unique experience.
You can also access the desktop version!
NOTE: In order to enjoy all the possibilities and functionalities offered by V2C Cloud, make sure you have a stable Internet connection.
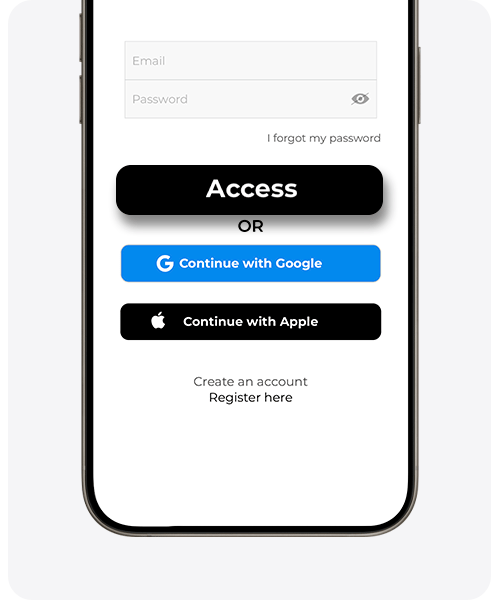
Access
Once you have downloaded the application, to access it from the app or from your computer (www.v2c.cloud), you will need to create an account. You have three options:
- With your email address
- With your Google account
- With your Apple account (only available for iOS users)
With your Google or Apple account (only available for iOS users): Click the corresponding button and follow the prompts.
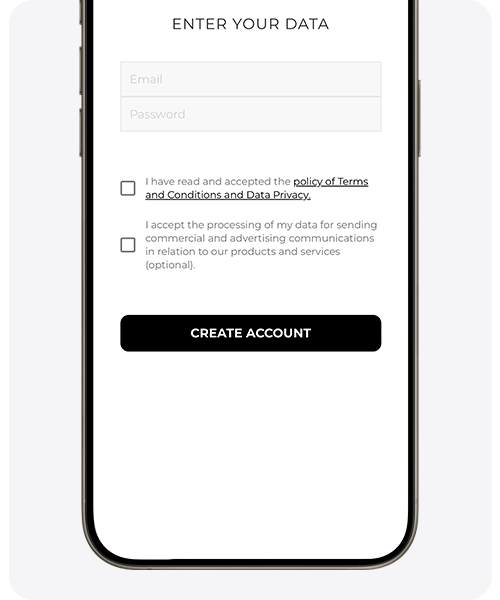
With your email: Click on ‘register here’, enter your details and select ‘create account’.
IMPORTANT: At the end of the registration you will automatically receive a confirmation email. If you do not find it in your inbox, please check your spam or junk mail folder. You will not be able to log in without confirming your email address. If you experience problems registering your email, it may have been previously registered. In case you forget your password, use the password recovery option.
To log in, follow the instructions shown in the images below.
To log out, simply click the profile icon and then select Log out.
V2C Cloud – smartphone version
V2C Cloud – web version


Add an e-Charger
You can add a new charger to your user account from the V2C Cloud smartphone application or from the web platform www.v2c.cloud.
It should be noted that once the charger is registered, it can no longer be paired by another person, unless it is deleted. However, the owner of the charger can share it with other users. If the e-Charger is not registered to any device and the ID number is public, it can be registered by a third party without the owner’s consent. Therefore, it is important to perform the first pairing which gives full administrator permissions to the charger.
When you have e-Chargers with multiple sockets, you must pair each connector as if it were an independent charger and enter the corresponding ID for each case.
Once paired, the device can request connection via WiFi. To be able to do this, Bluetooth must be activated. If you do not have it enabled, it is advisable to do this step later by clicking directly on skip WiFi configuration.
V2C Cloud – smartphone version
In the main screen of the app, click on the ‘+’ icon in the upper right corner

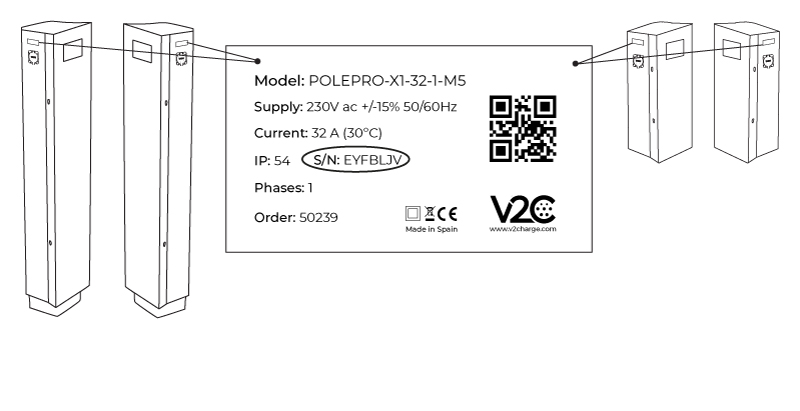
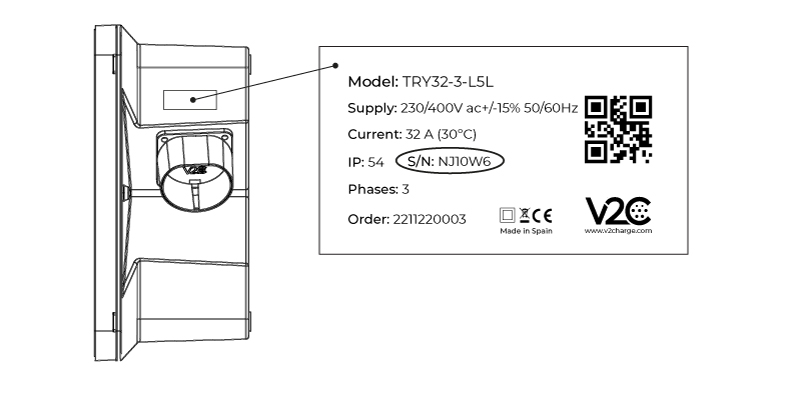
You can add your E-Charger* by manually entering the ID number, which is located on the side label of the device under S/N or serial number.

To pair the device by scanning the QR code on the label, click on the camera icon.

V2C Cloud – web version
To pair the e-Charger via the web, log in to the v2c.cloud platform and click on the add e-Charger button.

Select ‘Number of chargers’ in the menu panel.

Click the Add E-Charger button to add a new device.

Enter the charger ID number and assign it a name to identify it.

Bluetooth Connection
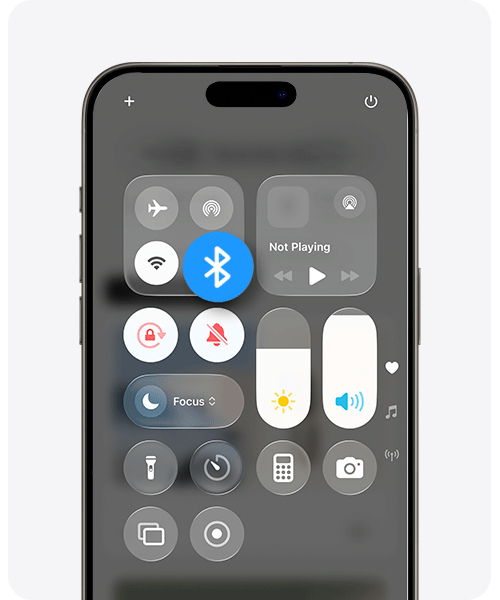
When the WiFi signal does not reach the charger installation site or is insufficient, you can connect to the e-Charger via Bluetooth. You will be able to operate your charger even when your smartphone is out of range.
Through this connection you can perform all the settings of the charger, as well as view remote statistics, real-time charging, etc. However, it will always be more limited than using it via Internet connection.
These functions via Bluetooth are available on equipment intended for private use in community garages and for smartphones with Android or iOS operating system.
For efficient and high-quality communication, it is advisable to remain within a distance of less than 10 meters from the charger throughout the entire process.
To ensure effective Bluetooth scanning of the e-Charger, it’s vital to activate the location function on your smartphone. This is because we use BLE (Bluetooth Low Energy) technology to minimize battery usage and ensure optimal performance.
With Bluetooth you can perform, among others, the following functions:
*The first time you must access the app with an Internet connection, then we will cache your user. It is recommended to open the application when you have an Internet connection so that the charging statistics are updated. The web platform does not work for users with this connection.


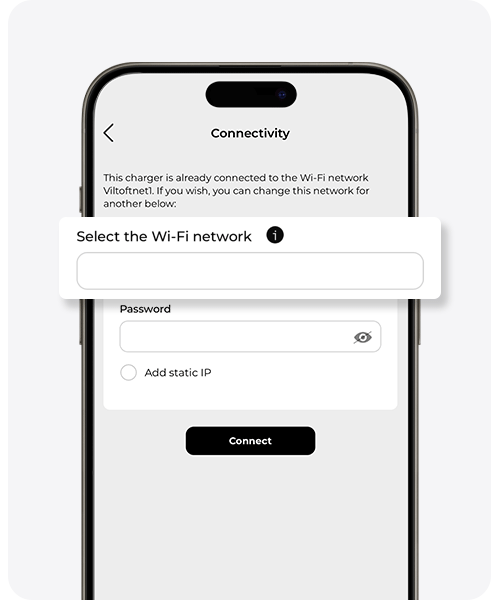

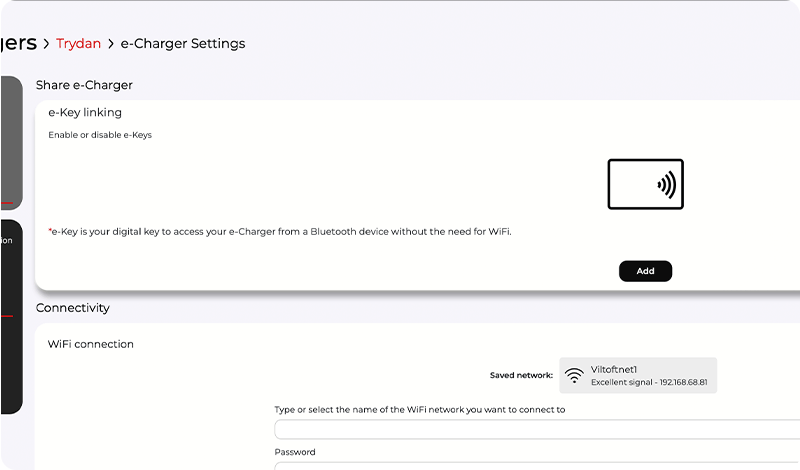
WiFi Connection
Depending on the e-Charger you have, the process will be done in one way or another. However, they all have in common that to establish communication via WiFi, it is necessary to do so through the V2C Cloud smartphone application and be sure to have a stable connection.
The connection between the charging point and the application is made via Bluetooth, so your smartphone’s Bluetooth signal must be active, and you should be positioned within a short distance from the e-Charger.*
If the network you wish to use does not appear in the list, enter the wireless network data exactly as it appears on the router (respecting uppercase and lowercase letters) and provide the password.
Once the connection is established, the e-Charger will proceed to restart. After a few minutes have passed since the restart, ensure that the WiFi icon on the e-Charger is active. If it’s not, verify that the password is correct.
The e-Charger is compatible only with the 2.4 GHz frequency.
ATTENTION: If your charger is a Trydan Pro or Pole Pro, you have three connection modes available: WiFi, Ethernet, or 4G.
* The use of Bluetooth requires enabling location services on some Android devices.
Certain company WiFi networks have security measures such as firewalls, DHCP blocking, port closures, etc. In such cases, the technical manager of the company should perform the configuration. For more information, please contact our support service.
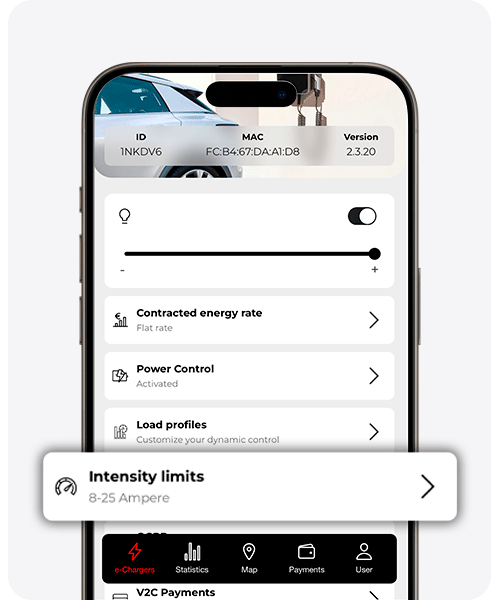
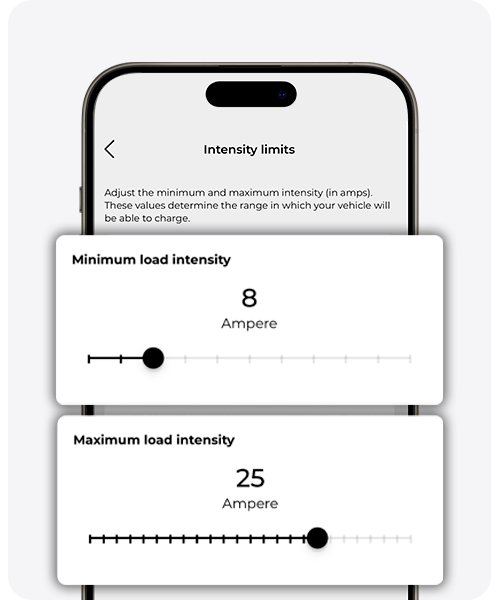
Set the current limits
Determine the range for the charging current by setting the minimum and maximum values. The minimum selectable current is 6 A, and the maximum is 32 A.
It is important to configure the maximum current according to your contracted power and the type of electrical installation:
– Single-phase installations: Multiply the contracted power (in kW) by 1,000 and divide by the mains voltage (230 V) to obtain the maximum current in amperes.
Example: 5.75 × 1,000 ÷ 230 ≈ 25 A.
– Three-phase installations: Multiply the contracted power (in kW) by 1,000 and divide by √3 (≈1.732) × 400 V × cos φ (usually 0.95) to obtain the maximum current in amperes.
Example: 11 × 1,000 ÷ (√3 × 400 × 0.95) ≈ 16.7 A.
WARNING: Adjust the maximum current according to the capacity of your installation. For example, if the charger allows 32 A but your wiring only supports 16 A, set it to 16 A to avoid overheating or overloads.
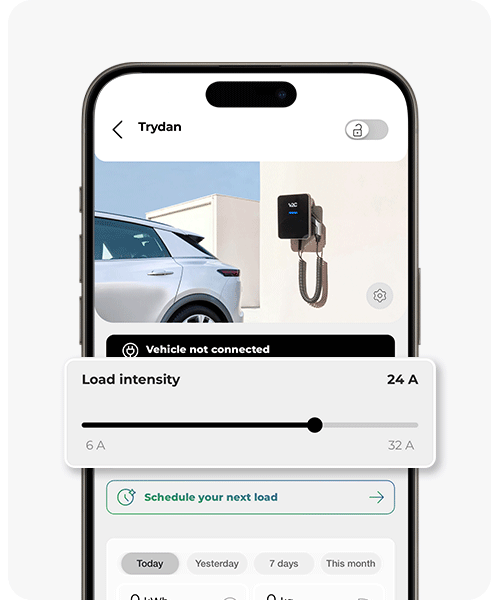
Adjust the charging current without dynamic power control
For chargers without dynamic power control enabled or available, you must manually select the fixed power at which you want to charge.
The app automatically shows the available values within the range previously configured in Current Limits.
Using the mobile app:
You can select the power at the top of the charger’s main screen by sliding the selector along the horizontal bar.
Using the web portal:
At www.v2c.cloud, just below the E-Charger image, slide the selector along the horizontal bar.
V2C Cloud – versión smartphone

V2C Cloud – versión web


V2C Cloud – versión smartphone

V2C Cloud – versión web


Adjust the charging current with dynamic power control enabled
When dynamic power control is enabled, the charging current is regulated automatically, so no manual adjustment on the charger screen is needed. You only need to configure the Intensity limits.
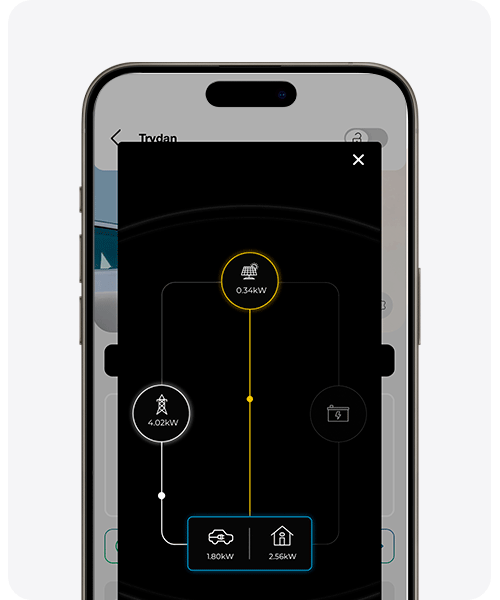
Dynamic power control detects your home or business electricity consumption in real time and automatically adjusts the charging current to make the most of the available power without exceeding the contracted limit.
WARNING: For proper operation of dynamic power control, ensure that your installation has a measurement device that allows real-time monitoring of the power consumed or generated (if you have a photovoltaic system).
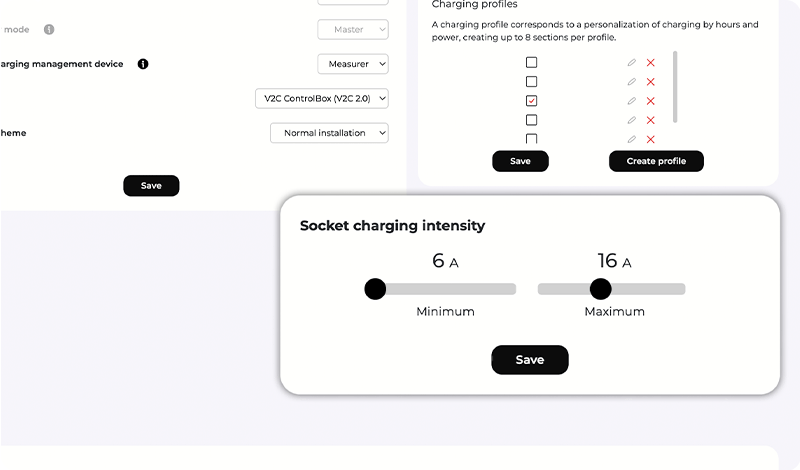
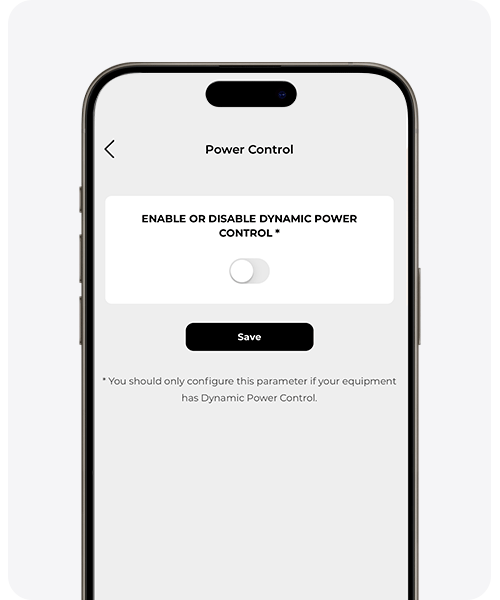
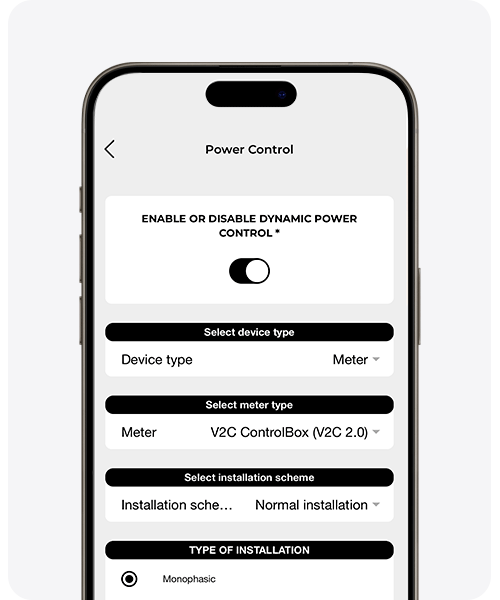
Activate and configure dynamic power control
Once the correct installation of the corresponding meter has been verified, it is essential to properly configure dynamic power control.
The configuration can be done via Bluetooth or WiFi (if the model allows), either through the V2C Cloud app or using a computer at www.v2c.cloud.
If using the V2C ControlBox meter (version 2.0), you will need to select the appropriate installation scheme:
– Standard installation: the current clamp is placed upstream, around the main incoming phase (the most common setup).
– Alternative installation: the current clamp is positioned downstream of the main supply point.


Customize the charging profiles for dynamic power control
Set different maximum charging powers according to the time slots of your electricity tariff.
WARNING: It is essential to configure at least one charging profile that covers all 24 hours of the day, both on weekdays and weekends.
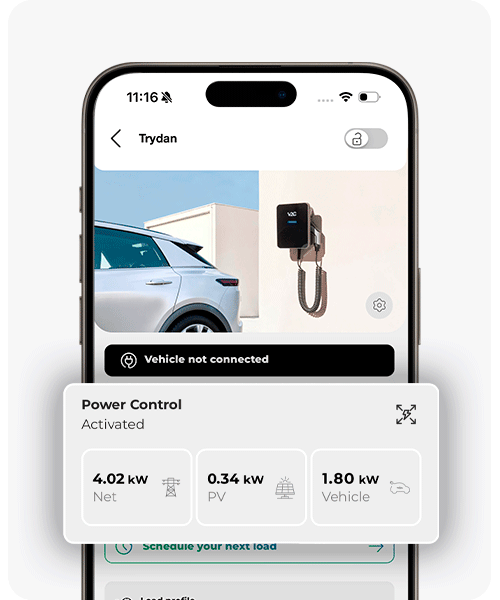
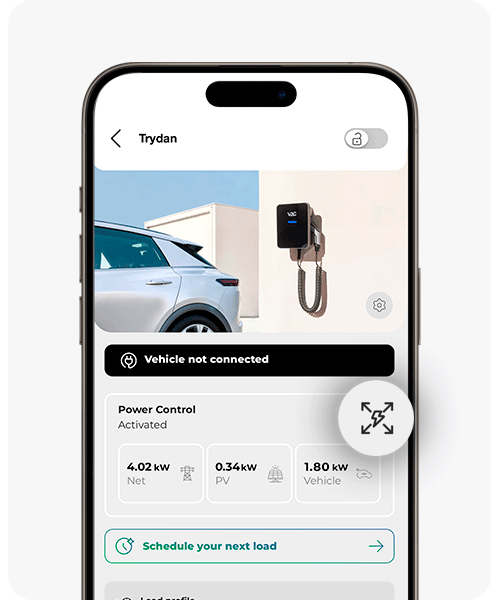
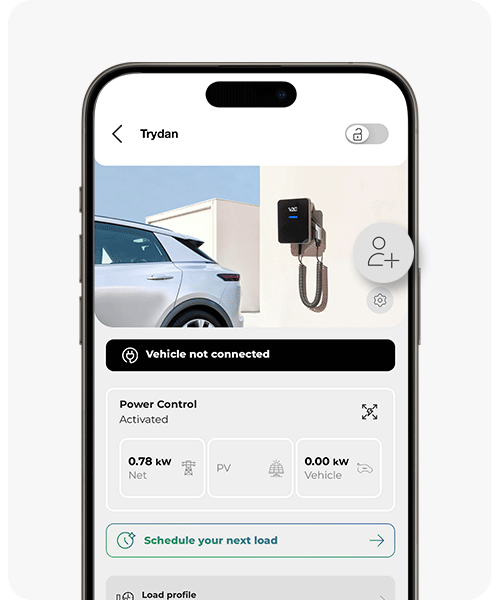
General Control
Enable / Disable e-Charger
Our e-Chargers can be locked or unlocked, in order to prevent use by unauthorized third parties. This lock prevents the use of the charger by another person, including the owner of the charger. In order to charge a car it will be necessary to unlock the device.
It is possible to perform the locking/unlocking via Bluetooth or WiFi. Depending on your e-Charger model, there are up to four ways to enable or disable your charger:
Option 1 – via the app
You can enable or disable it from the V2C Cloud main screen

If you are connected via Bluetooth, tap the refresh button to check its current status. If it is locked, it will appear like this:

It is also possible to enable or disable it by clicking the lock icon on the charger’s main screen

Option 2 – via the web platform


Option 3 – via the navigation buttons
If your device is a Trydan, enable the navigation button shortcuts in Special Options within the E-Charger settings. With this option activated, you can lock and unlock the device by pressing the lower physical navigation button on the left side of the E-Charger.
If your charging point is locked, the display will show e-Charger disabled. If there is no display, the LED lighting remains off and flashes white briefly every 10 seconds.
Option 4 – V2C SmartLock
La tecnología V2C SmartLock de tu e-Charger Trydan permite bloquear y desbloquear de forma inalámbrica el cargador mediante un e-Key (smartwatch, pulsera de actividad, llavero o incluso con tu coche), es decir, un dispositivo que utiliza la conectividad BLE (Bluetooth Low Energy o bajo consumo de energía de Bluetooth).
V2C SmartLock no solo simplifica el proceso de carga, también refuerza la seguridad al bloquear automáticamente el cargador cuando te alejas.
Schedule a charge
You can schedule a charge through the app for devices with Bluetooth or WiFi, and through the web platform for devices with WiFi.
V2C Cloud – smartphone version
Access the charger you want to schedule and then tap on ‘Schedule your next charge‘

You have two options: Classic Scheduled Charging, where you select a start and end time, or EcoCharging, where advanced AI learns your habits and daily routines to automatically charge your vehicle during the cheapest hours (a market-rate electricity plan is required).
If you choose Classic Scheduled Charging, follow the next step.
If you choose EcoCharging, follow the instructions provided here

If you select ‘Classic Scheduled Charging‘, specify the days of the week and the time period you want it to be active, then click the Add button to save the schedule. You can create up to 2 timers

V2C Cloud – web version
To access the e-Charger section, simply open the menu and select it from the list of options. Next, go to e-Charger and select the charger you want to schedule
Next, go to e-Charger and select the charger you want to schedule

You can schedule charges using 2 timers, which can be combined or used separately. Once you select the days and time periods you want to charge, click the Save button.

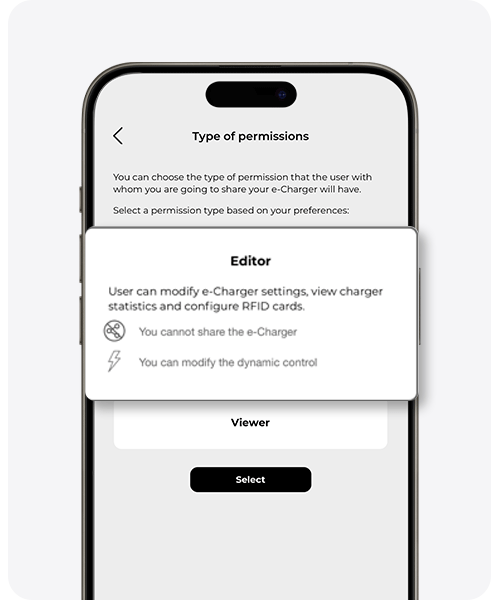
Share your e-Charger
To share a charger with a third party, you must do so through the app. In the V2C Cloud platform, you can edit the role and delete a profile, but you cannot add a new one.
When sharing the e-Charger, you will need to choose between viewer or editor roles.
VIEWER: The user can view all data and statistics without making changes.
EDITOR: The user can modify the e-Charger settings, view statistics, and configure RFID cards. They can modify the energy tariff but cannot share the e-Charger with other users.
* If a charger is shared with an email different from the usual one, it may happen that the E-Charger does not appear when refreshing the page. Delete the device’s cookies to update it correctly.


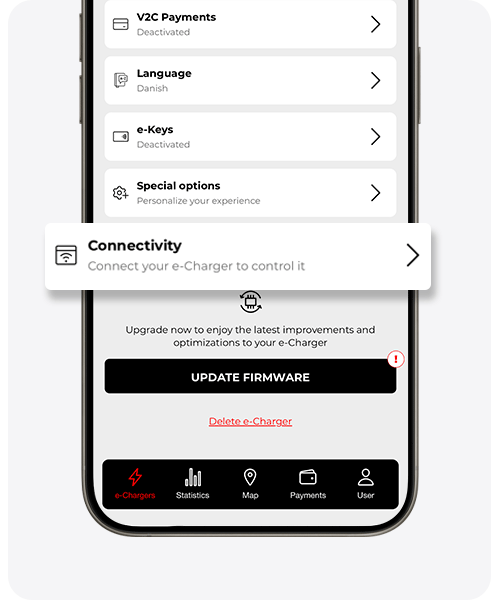
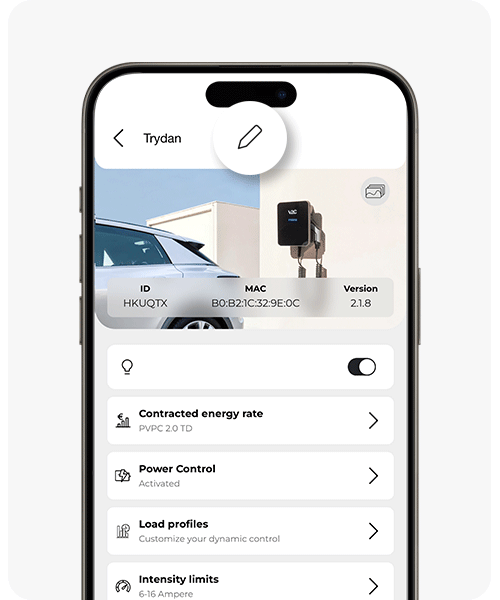
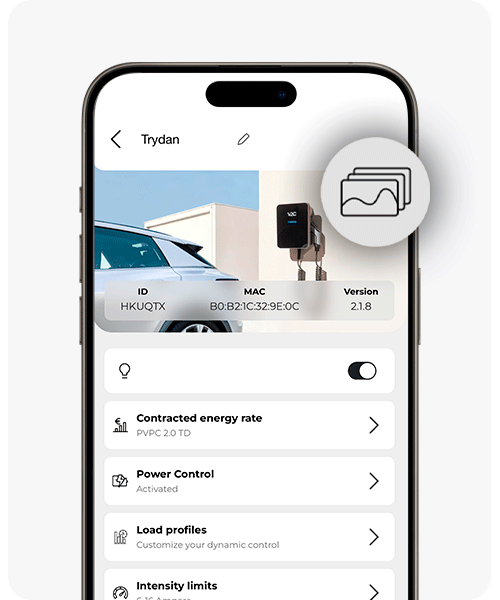
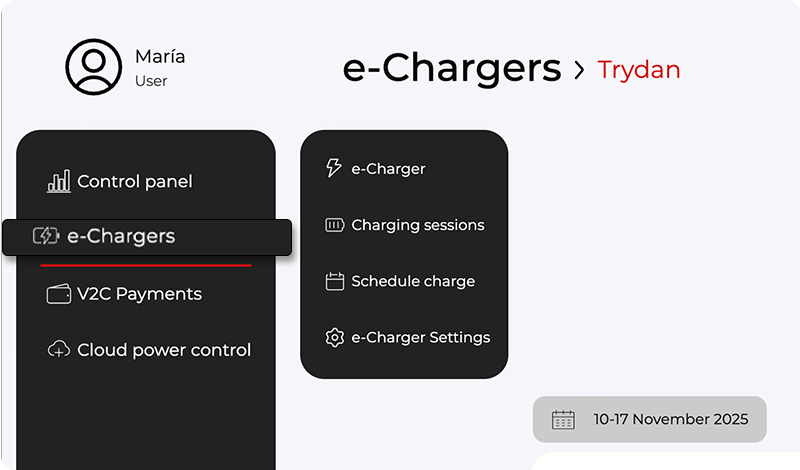
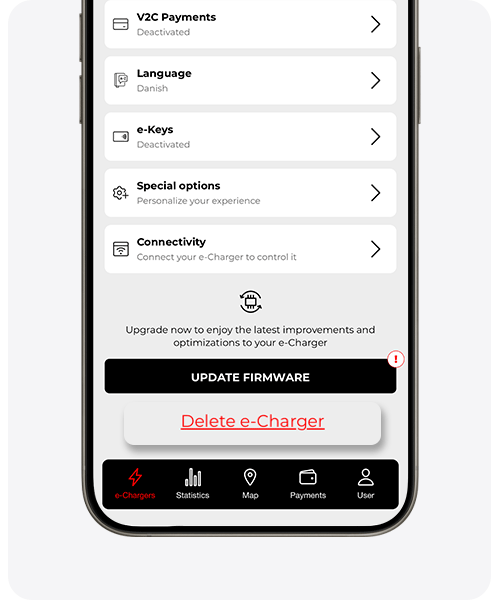
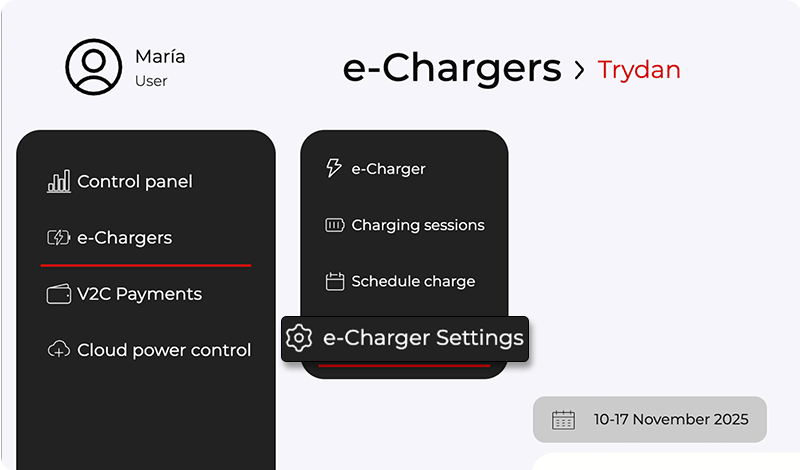
e-Charger Configuration
In order to make the various adjustments in this section, you must access the e-Charger and click on the settings icon.

Edit the name of an e-Charger
In the smartphone application, click on the pencil icon and edit the name. To save it, press the enter key on your smartphone’s keyboard.
To change it from the web platform, access the e-Charger settings menu and select the ‘change charger name’ button. Define the name you want to give to the charger and press the ‘save’ button.
V2C Cloud – versión smartphone
V2C Cloud – versión web


V2C Cloud – smartphone version
V2C Cloud – web version


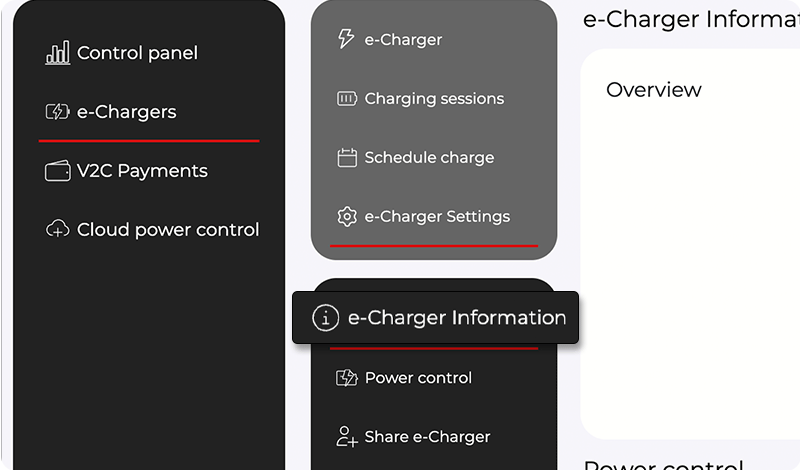
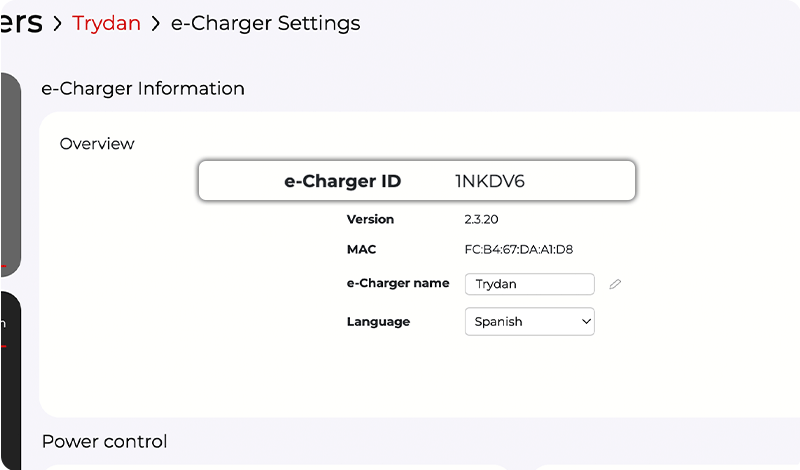
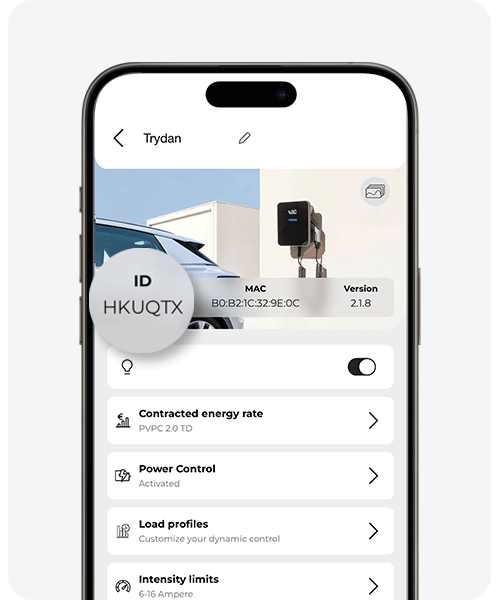
Identify the e-Charger ID number
You can find the ID number that identifies your charger both in the web version and in the smartphone application. It is visible in the first section within the charger settings menu.
It is important to verify that the number displayed in the application matches the one in the S/N section of the label located on the side of the charger.
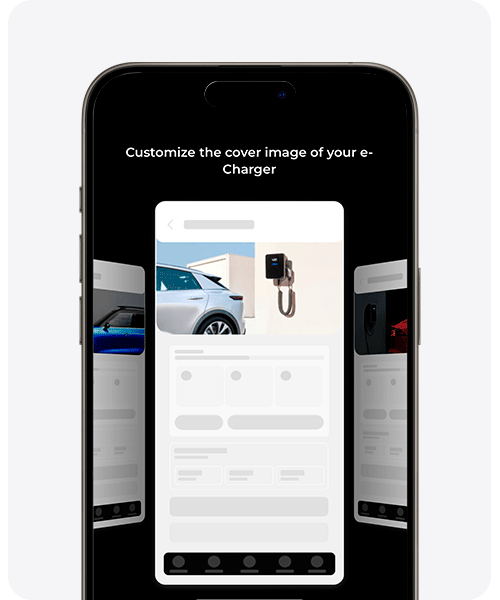
Customize the cover image.
Choose the image you like best for your charger’s main screen.
Swipe sideways to browse the available photos and select the one you want as the cover image.
You can change it at any time from this same section.
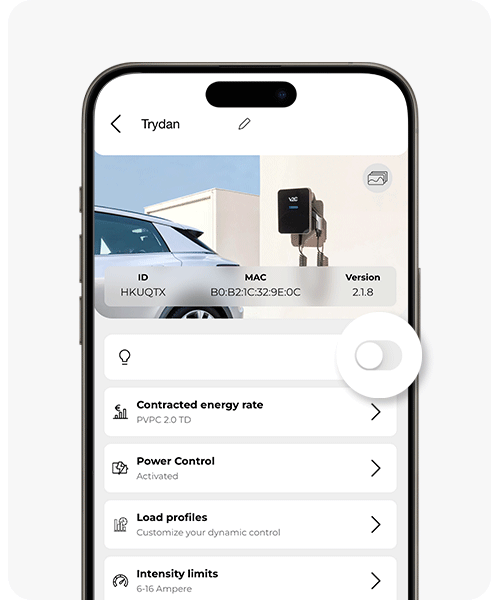
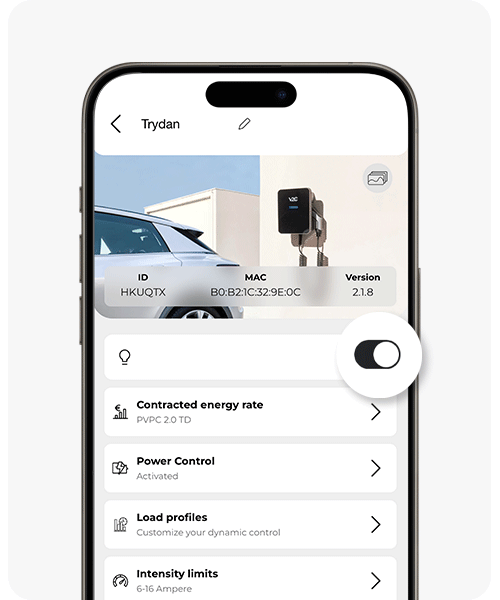
Turn the LED lighting on or off
If you have a Trydan E-Charger, the V2C logo lighting on the front lets you know its charging status, whether a charge is scheduled, if there’s any error, or if the device is updating.
You can turn this LED lighting on or off by following the instructions shown in the photos.
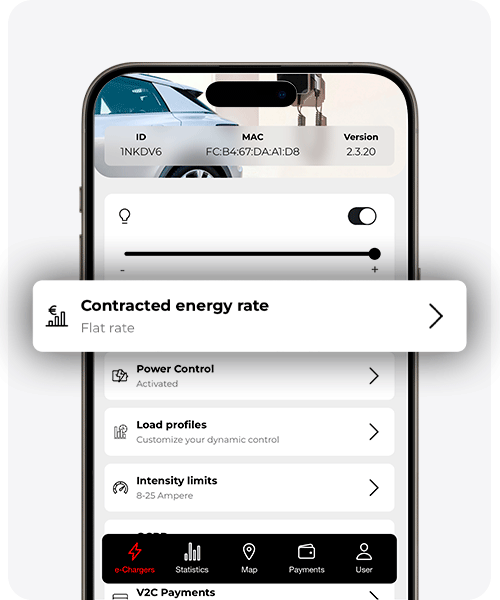
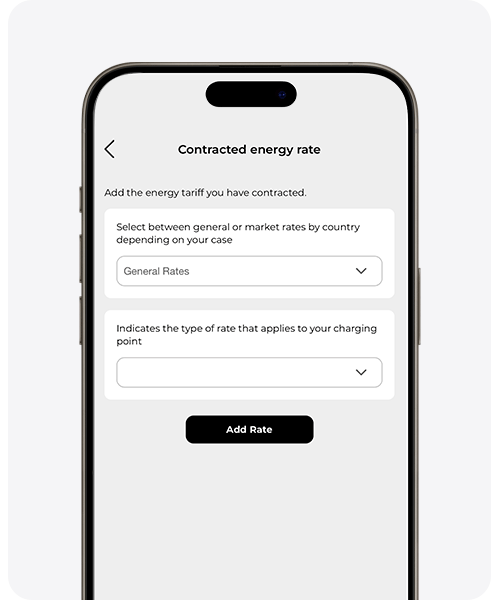
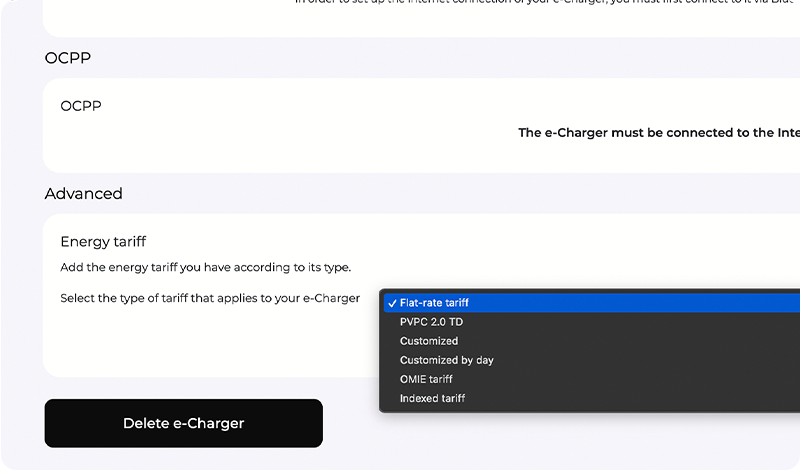
Modify the contracted energy rate
It is important to add or update your contracted energy tariff so that V2C Cloud can accurately calculate the real cost of each charge and provide more detailed reports on energy consumption and expenses.
Select the type of tariff you have and the price per kWh (for non-regulated tariffs).
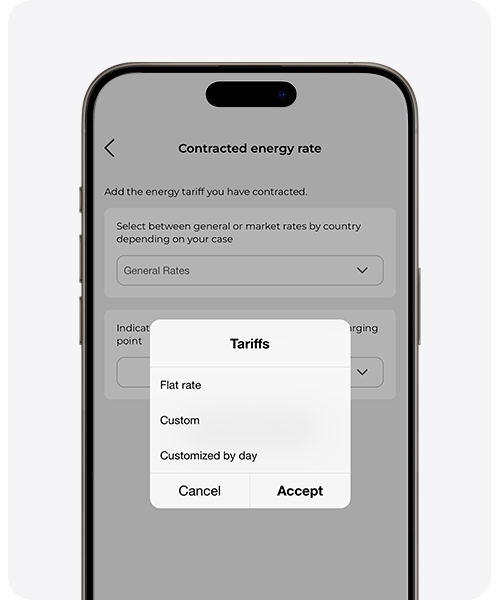
You can choose from:
– General tariffs:
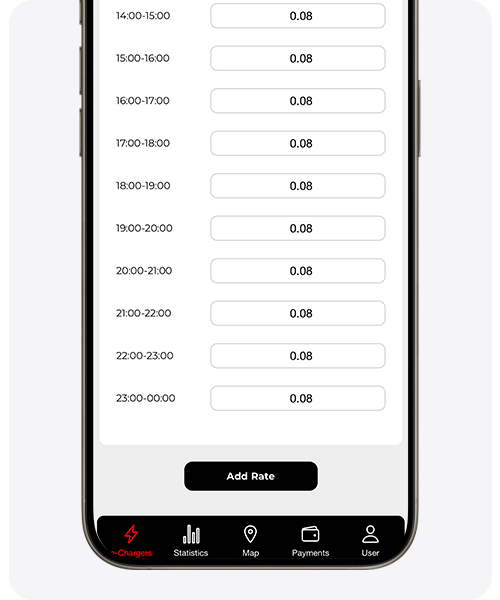
These allow you to manually enter the cost per kWh according to your electricity contract. Choose a fixed kWh price (flat rate), a kWh price based on time ranges (custom), or a kWh price based on time ranges and days of the week (day-specific custom). If you select the last option, swipe to the right to view all days of the week.
– Market-based tariffs by country:
The system automatically updates the kWh prices according to the current tariffs in your country. In Spain, you can choose from the following options:
1. Indexed market: applies the indexed tariff, which varies according to hourly wholesale market prices.
2. PVPC market: corresponds to the PVPC 2.0 TD regulated tariff, reflecting actual retail electricity market prices set by the government.
3. Spot market: uses the OMIE tariff, based directly on the hourly prices published by the Iberian Market Operator (OMIE).
V2C Cloud – smartphone version

V2C Cloud – web version


WARNING: The settings for ‘Power Control’, ‘Charging Profiles’ and ‘Current Limits’ have been explained earlier. Make sure these parameters are correctly configured, as they are essential for the proper operation of the E-Charger.
V2C Cloud – smartphone version
V2C Cloud – web version


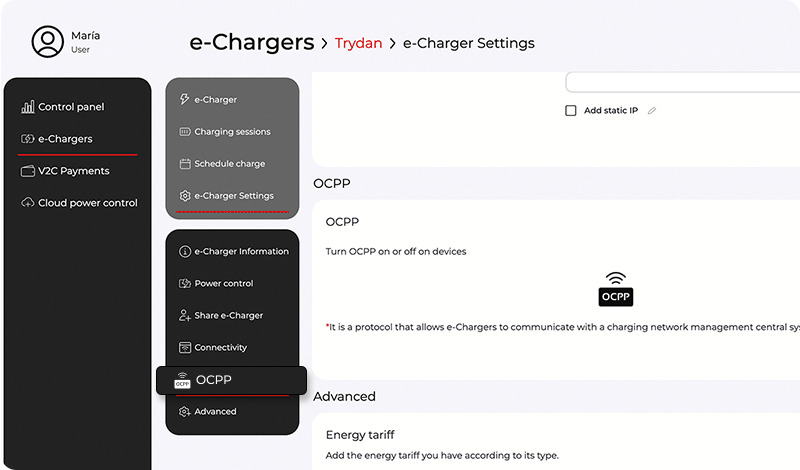
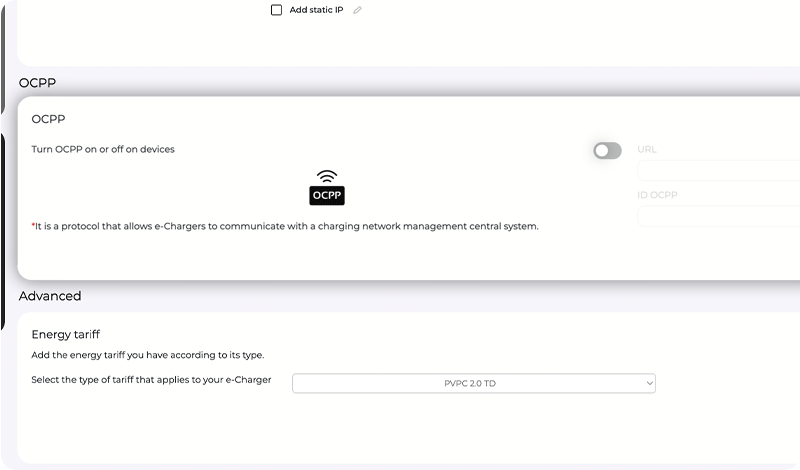
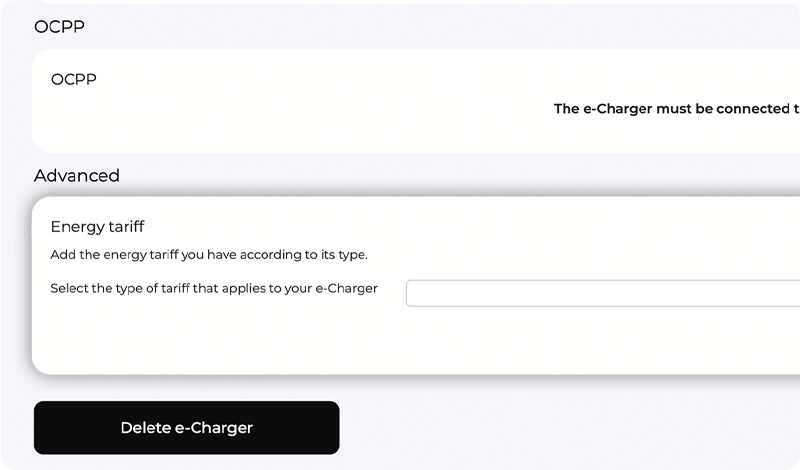
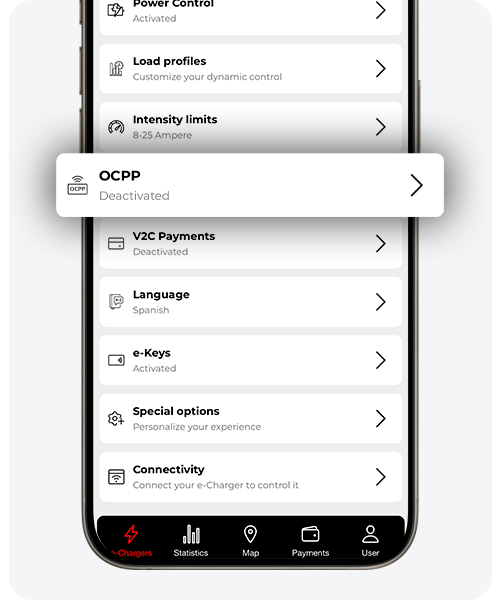
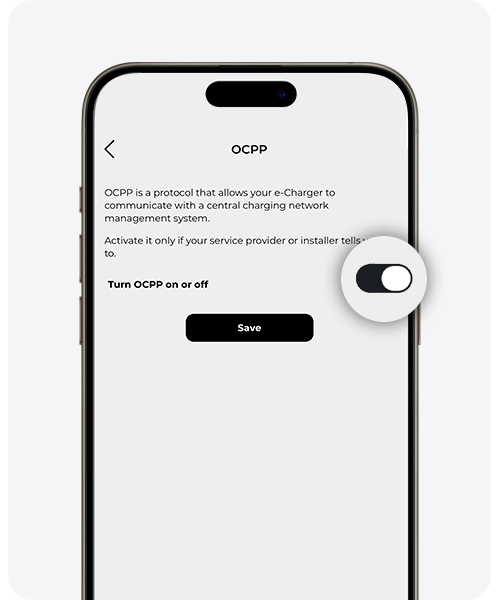
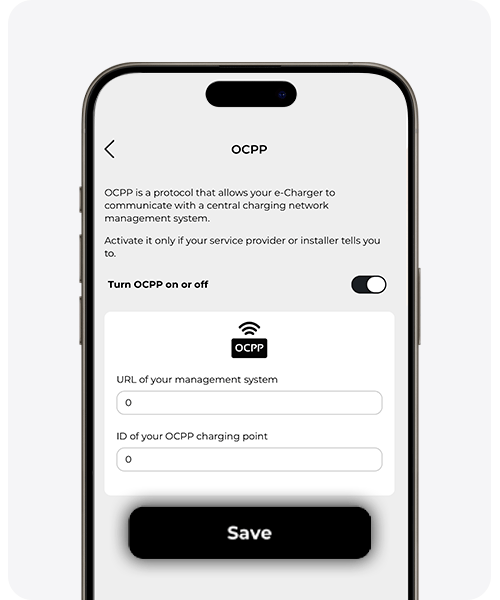
Enable OCPP
Enable this option only if you want your E-Charger to communicate with a central charging network management system.
Enter the management system’s URL and the ID number with which the charger was registered on the server.
For OCPP to work properly, a stable Internet connection is required. Learn more about OCPP configuration here.
Enable V2C Payments
Enable this option only if you want to use this simple payment system to share your charger with multiple users and charge for each session.
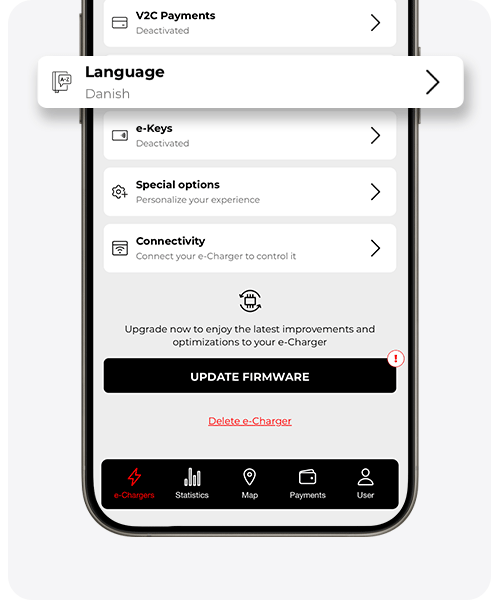
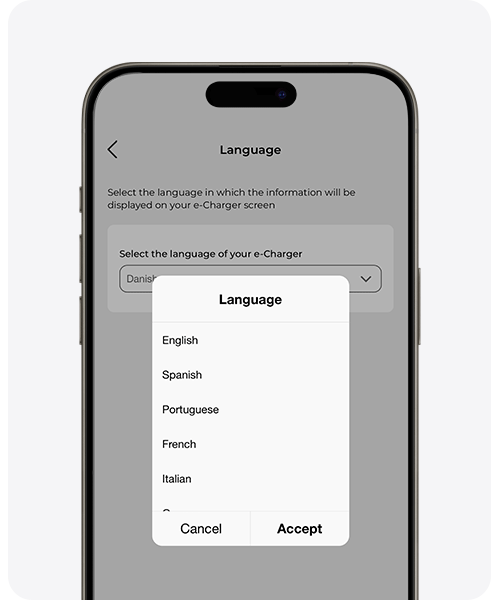
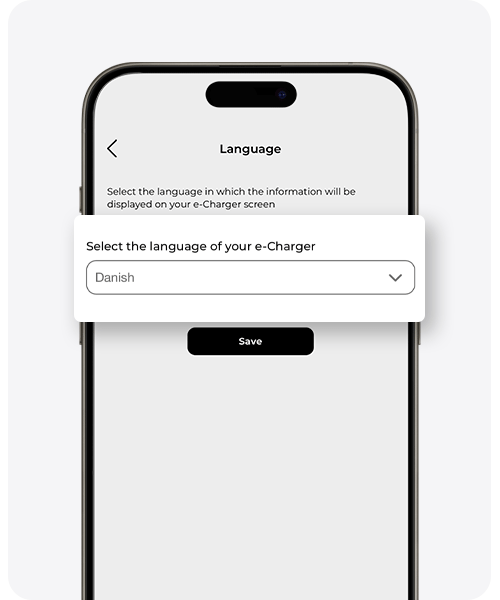
Change the e-Charger language
In this section, you can change the language of the charger. However, the language of the V2C Cloud application adapts to the language configured on your smartphone device.
To change the language of the e-Charger in both the app and the web platform, click on the language section and select the language you want. Remember to press the ‘save’ button to save the configuration. You can also change the language from the charger’s navigation buttons.
V2C Cloud – smartphone version

V2C Cloud – web version
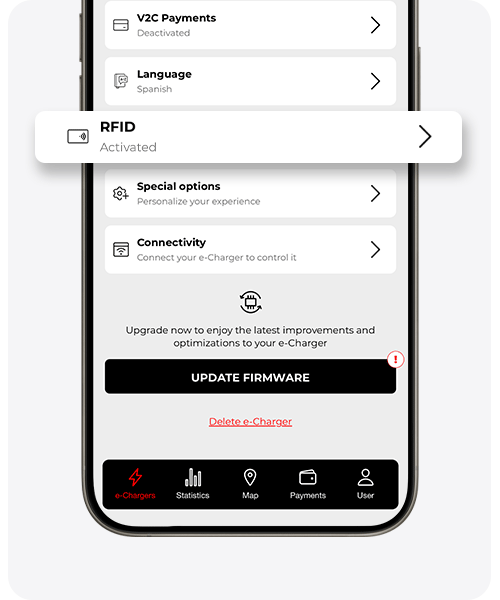
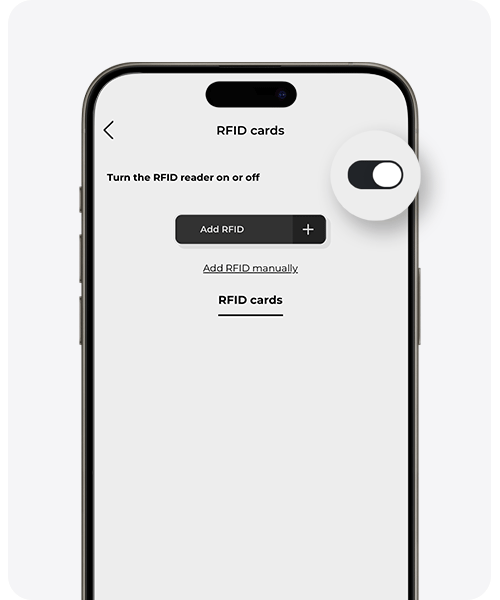
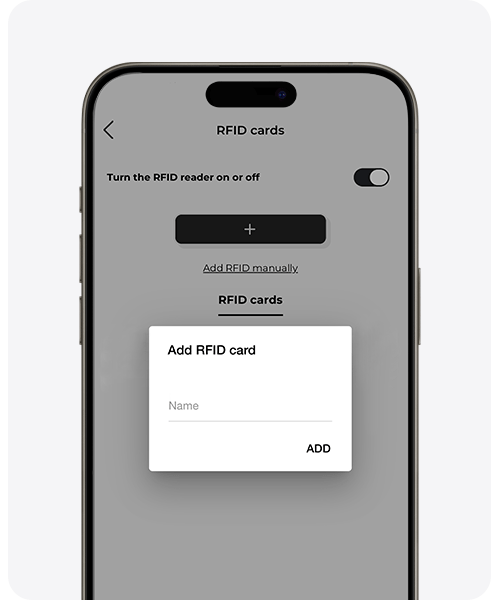
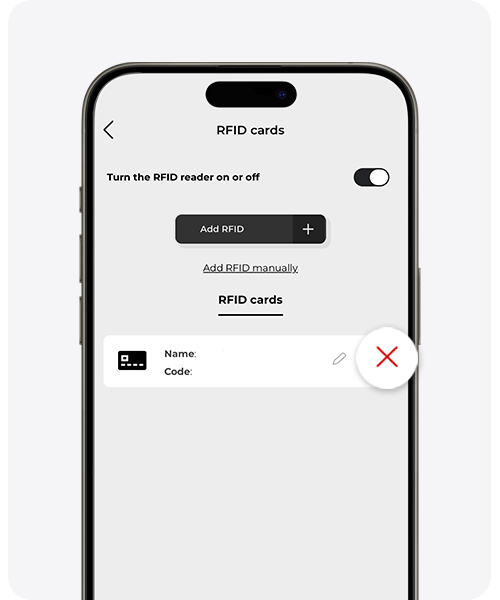
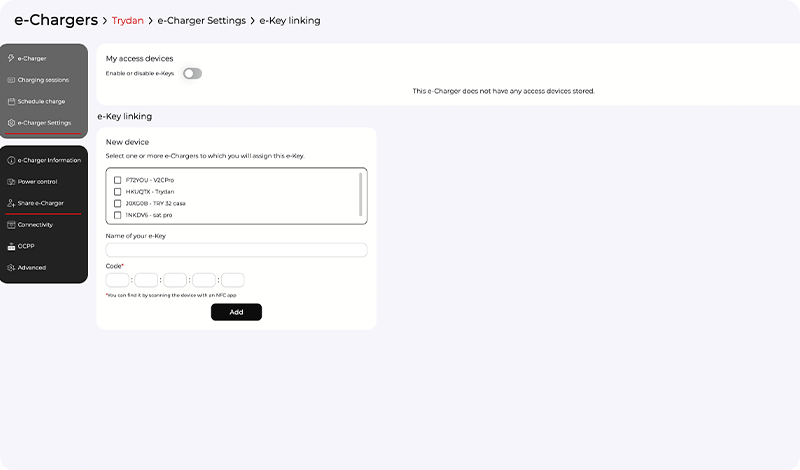
Enable RFID / e-Keys and add or modify a card or e-Key
The name of this section may vary depending on the charger model:
– In Trydan, it appears as ‘e-Keys’
– In Trydan Pro, it appears as ‘RFID / e-Keys’
– In Pole Pro, it appears as ‘RFID’
– In Denka, it appears as ‘RFID’
RFID cards
They allow you to share the E-Charger with other users through secure and authorized access.
Once registered, users simply place the card near the reader to identify themselves and charge with ease.
e-Keys
They use V2C SmartLock technology to lock and unlock the E-Charger wirelessly by proximity. The charger unlocks automatically when it detects the device nearby and locks again when it is out of range.
Find more details about e-Key requirements and setup here.
V2C Cloud – smartphone version

V2C Cloud – web version


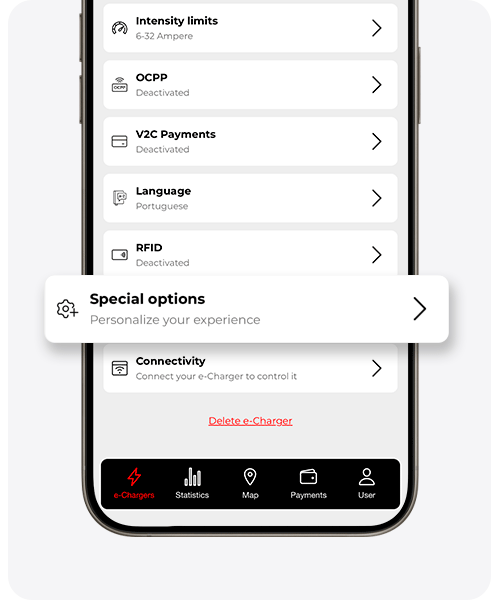
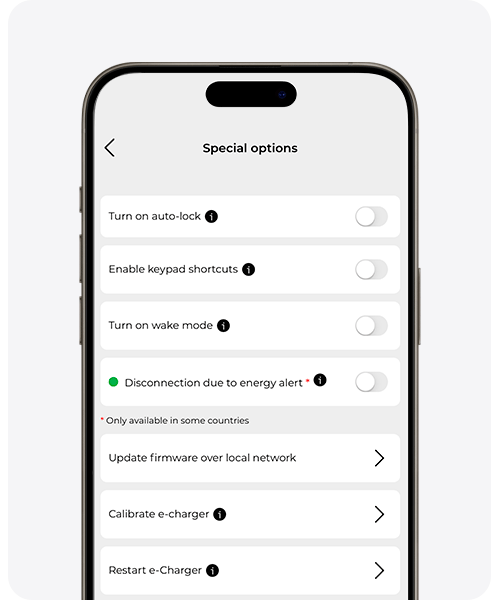
Special options
Enable auto-lock (Trydan)
Enable this option if you want your E-Charger to lock automatically after 60 seconds of inactivity.
Button shortcuts (Trydan)
Enable this option to perform physical shortcuts, such as locking or unlocking your E-Charger by holding the lower button, or enabling or disabling scheduled charging by holding the upper button.
Enable wake-up mode
Enable this option if you experience issues when starting or managing the charging process.
Energy alert disconnection (currently not available in Spain)
This option allows the charger to automatically disconnect in case of a risk of electrical grid overload.
Update firmware via local network
Use this option to update the firmware if you do not have an Internet connection.
Calibrate E-Charger (Trydan)
If you experience charging issues, this option can help resolve them. It allows correction of possible communication misalignment between the E-Charger and the vehicle. Learn more details here.
Configure phase mapping (Pole Pro)
This option allows you to define the arrangement of the cables connected to your meter. You may need to swap these cables, so it is crucial to configure them correctly to ensure accurate measurements from your E-Charger. For example, if you have a single-phase electric vehicle and in your installation the cable for phase 1 is placed in the slot designated for phase 2, you should enter 1 for phase 2, and so on for all three cables.
Restart E-Charger
Use this option to restart the charger without having to switch the breakers off and on.
WARNING: The ‘Connectivity settings have been explained previously. Make sure your WiFi connection is properly configured to access all the E-Charger’s features.
V2C Cloud – smartphone version

V2C Cloud – web version


Update firmware
We are committed to the continuous improvement of our products’ capabilities. Therefore, it is important to keep the firmware up to date to benefit from significant improvements and new features.
Learn more details here.
Remove e-Charger
To remove a charger, click on ‘Remove e-Charger‘ and confirm that you want to delete it.
V2C Cloud – smartphone version

V2C Cloud – web version


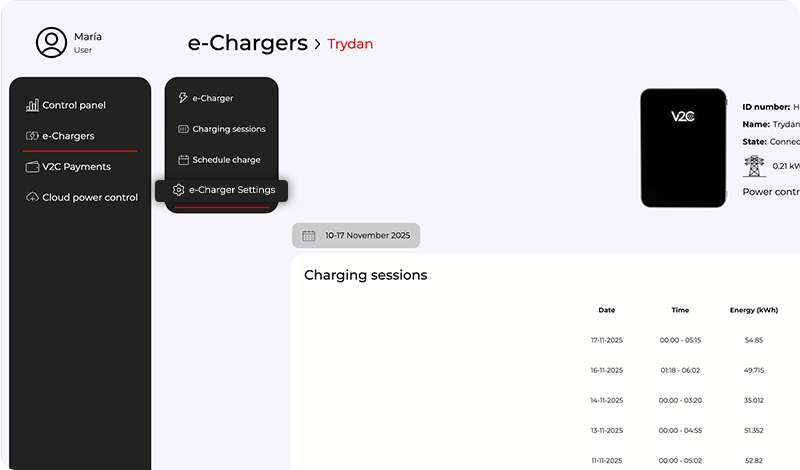
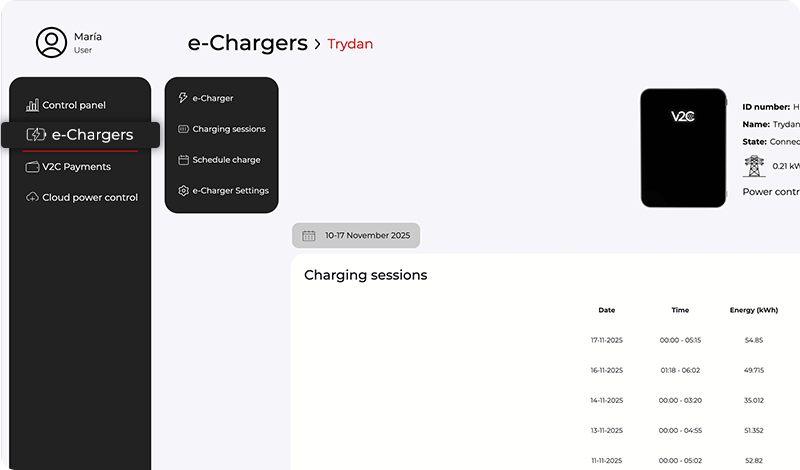
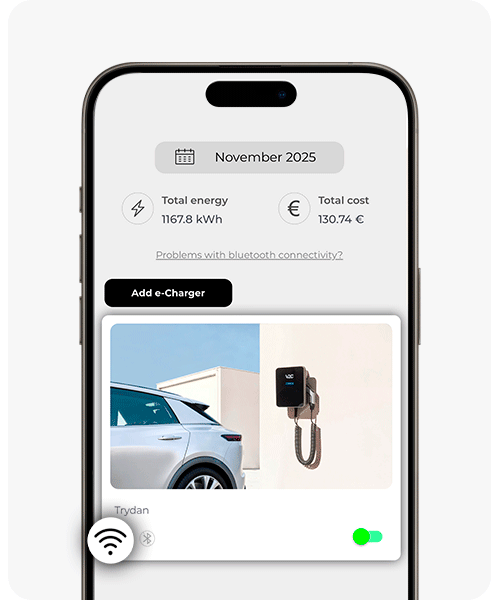
Check statistics
You can view statistics both globally (if you have multiple chargers) and individually for each e-Charger. In both cases, you can check kWh, charging time, and cost.
V2C Cloud – smartphone version
To view the global statistics for all e-Chargers on your account, click the ‘Statistics‘ button in the bottom menu. Then, click the icons at the top of the graph to see total energy, charging time, cost, and a history of all charges across all e-Chargers in the account

To view the statistics for a single e-Charger, go to the charger’s screen and click the ‘View Statistics‘ button. Then, click the icons at the top of the graph to see total energy, charging time, cost, and a history of all charges for that e-Charger

V2C Cloud – web version
Access the ‘control panel‘ from the menu

In the dropdown, select ‘Global Statistics‘

‘Individual statistics‘ appear directly on the main screen of the charger you want to view.

NOTE: In some community garages and other situations where WiFi connection and coverage are not stable, you must connect to the e-Charger via Bluetooth. The statistical data of the last 5 charges is stored in the application cache. You can upload them to our server and view them only once your smartphone has access to internet connection and you restart the application. The message “Statistics are cached, make sure you have a good internet connection to send them” appears on the main screen of the e-Charger.
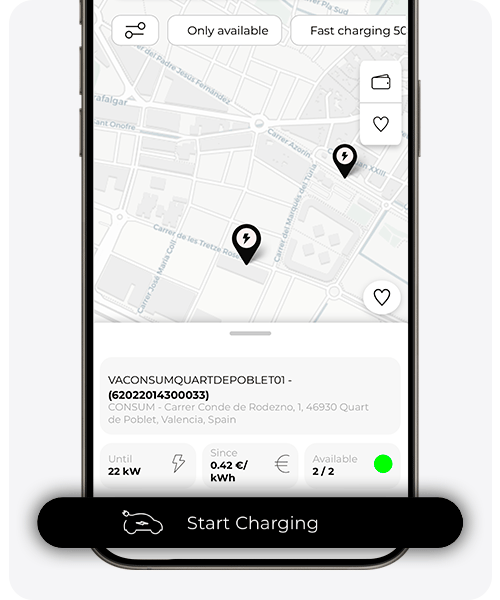
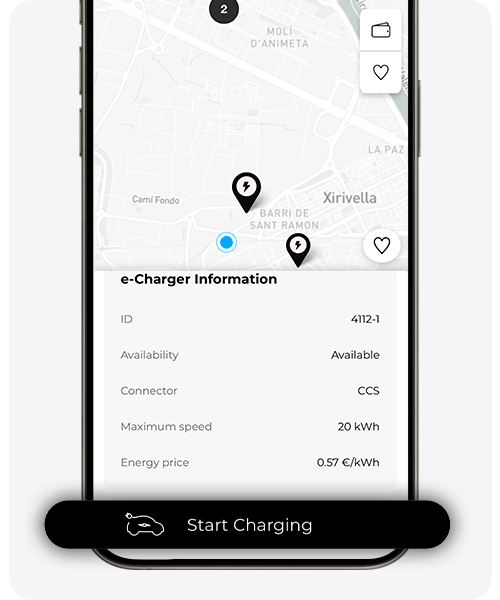
Charging at public chargers
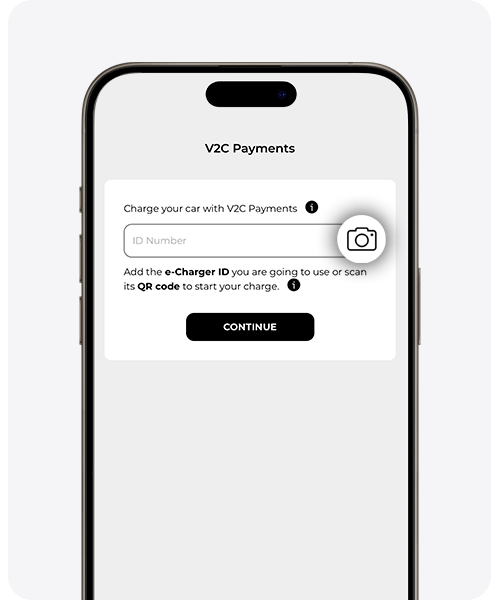
In the ‘Map’ section, you can locate public chargers from multiple integrated operators, start charging easily, and pay securely through V2C Payments.
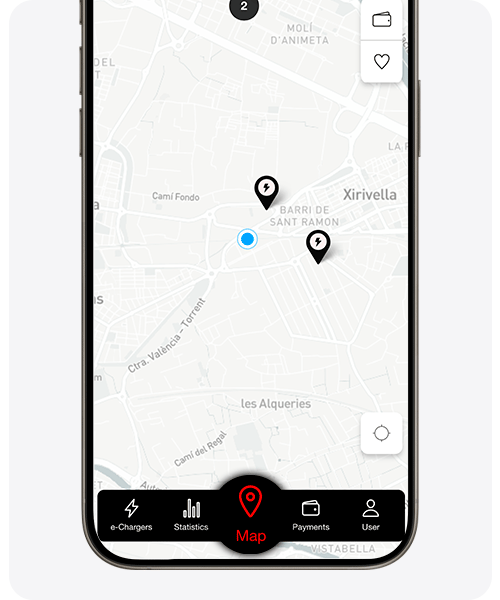
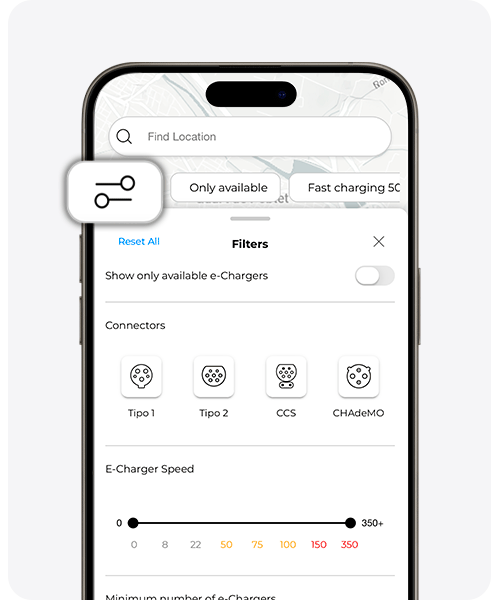

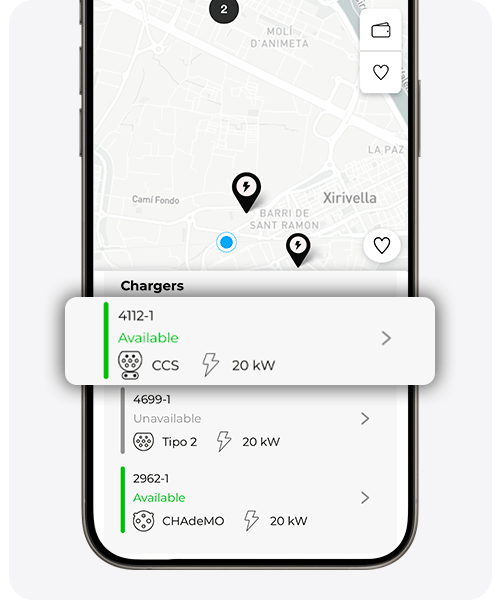

In the ‘Map’ section, you can filter public chargers based on different criteria, such as availability, connector type, power, number of chargers at the station, or operator.
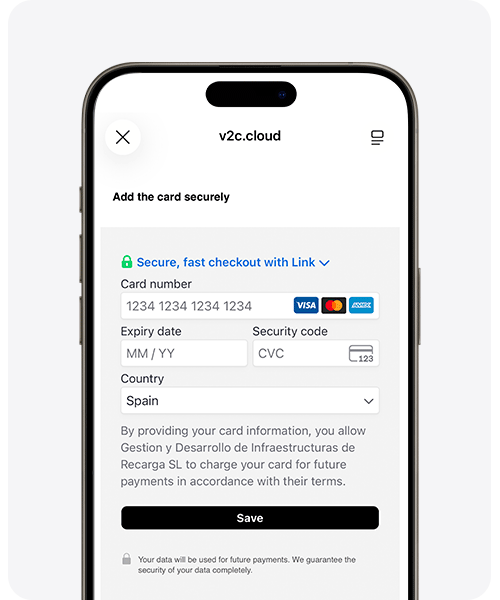
If you don’t yet have a payment method added in V2C Payments, a final screen will appear where you need to enter your card details to complete the process and start charging.
Additionally, you can view your transactions and save your favorite e-Chargers for quicker access during future charges.
Transactions can be found under the wallet icon, while favorites can be managed by clicking the heart icon, both located at the top right of the screen.
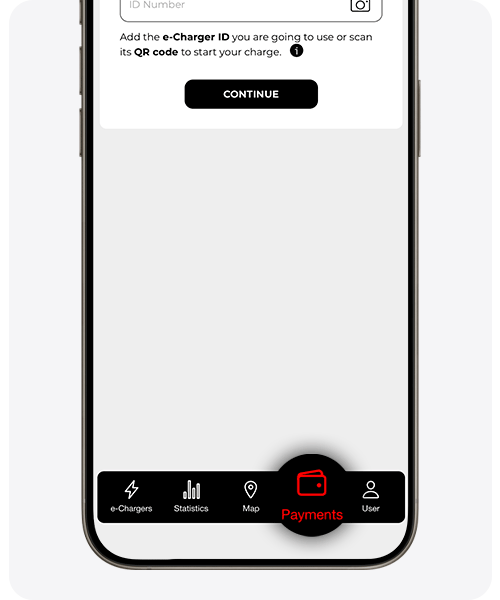
Payments
If you want to use a charger belonging to another person or business that has registered their equipment on this platform, follow the steps below to start charging and make the payment directly from the app.
If, on the other hand, you own a charger and want to share it with other users to receive payment for the charges, follow the steps outlined here.
Edit my user profile
User data
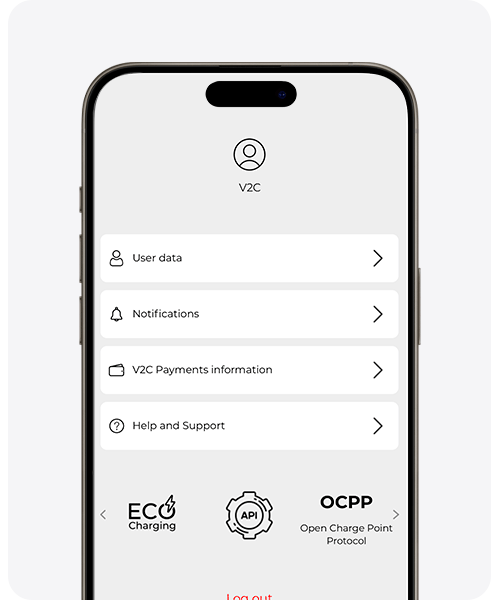
User data
Change your user password and add the information about your electric vehicle. This information is mainly used to allow you to enjoy all the advantages offered by EcoCharging.
If you want to delete your V2C Cloud account, you can easily do so in this section by clicking on ‘Delete account’. Keep in mind that the associated e-Chargers, as well as the user data and password, are permanently deleted.
Notifications
Enable or disable notifications. You can immediately know when the vehicle has finished charging or receive notifications with relevant information about EcoCharging.
V2C Payments Information
Enter the billing details and review the payment transactions and invoices for the charging sessions carried out through V2C Payments.
Help and Support
Access the Support Area, review the version history, watch informational videos, and resolve the most frequently asked questions.
FAQs
I can’t unlock my e-Charger. What is the solution?
If your app isn’t working, you don’t have your phone, have lost your account, or something isn’t right and you need to unlock your charger (previously locked by you) immediately, you must cut the power from the protections (internal or external), wait 5 seconds, and reconnect them. The e-Charger will always start unlocked.
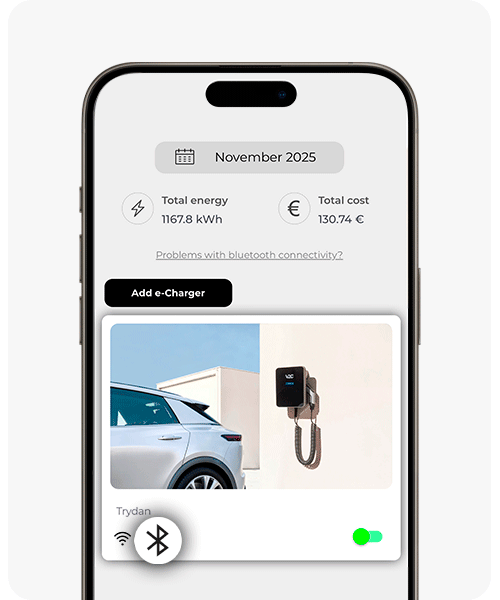
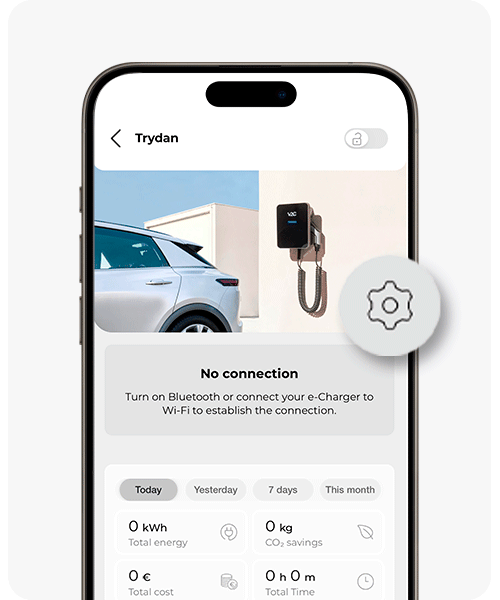
How can I tell if my e-Charger is connected to the Internet?
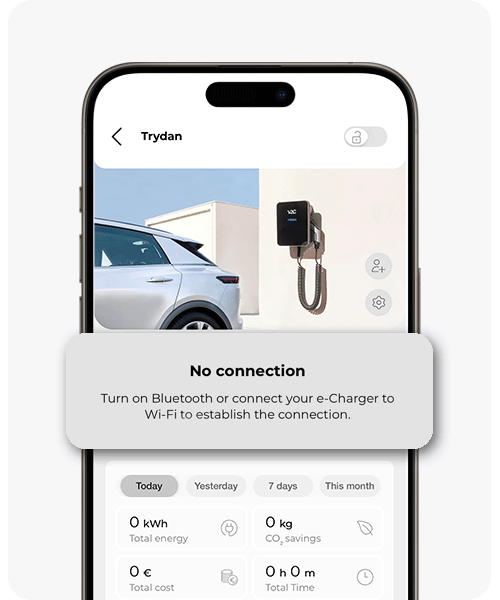
You can check if your charger is connected to the Internet through the web platform or the mobile app. In the app, if the device is connected, the indicated symbols appear unchecked, as shown in the first image of the gallery.
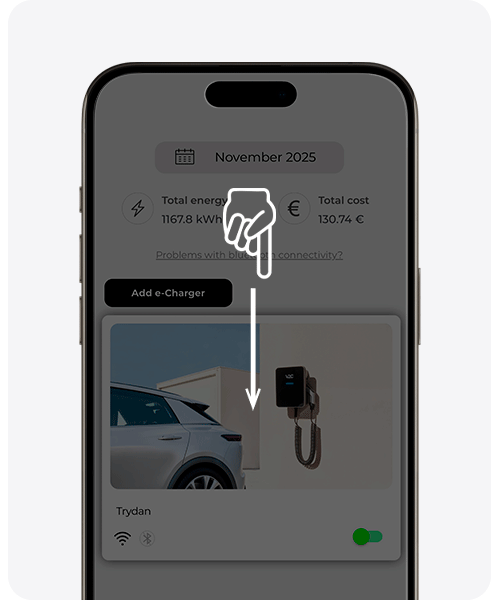
Additionally, if you access the main screen of the e-Charger and it has no Bluetooth or WiFi connection, the information will appear as shown in the second image.
On www.v2c.cloud, if the charger has no type of connection, the following image will appear and it will indicate ‘device offline’.
Why does my charger reduce the charging power during the last minute of charging?
To maximize the lifespan of your e-Charger, we work to minimize the presence of electric arcs on the contacts. For this reason, when the charge is about to finish, we reduce the power to a minimum to prevent the formation of electric arcs when cutting off the vehicle’s power.
What should I do if my e-Charger doesn’t connect to Bluetooth?
Restart your mobile phone
Close the app completely and reopen it. Make sure it isn’t running in the background.
Turn Bluetooth off and then back on.
Do you need technical support?
Resolve your issue instantly through our AI Chat. If it is not resolved, submit a request via the Technical Support Centre and we will contact you as soon as possible to provide the best solution.