

Remote Control Connection Manual
One way to lock and unlock the e-Charger is through a remote control. Below, we show you the steps to enable remote control so you can conveniently manage the charger and control the charging from a distance.
Steps for connecting and installing the remote control
1. Access the power board
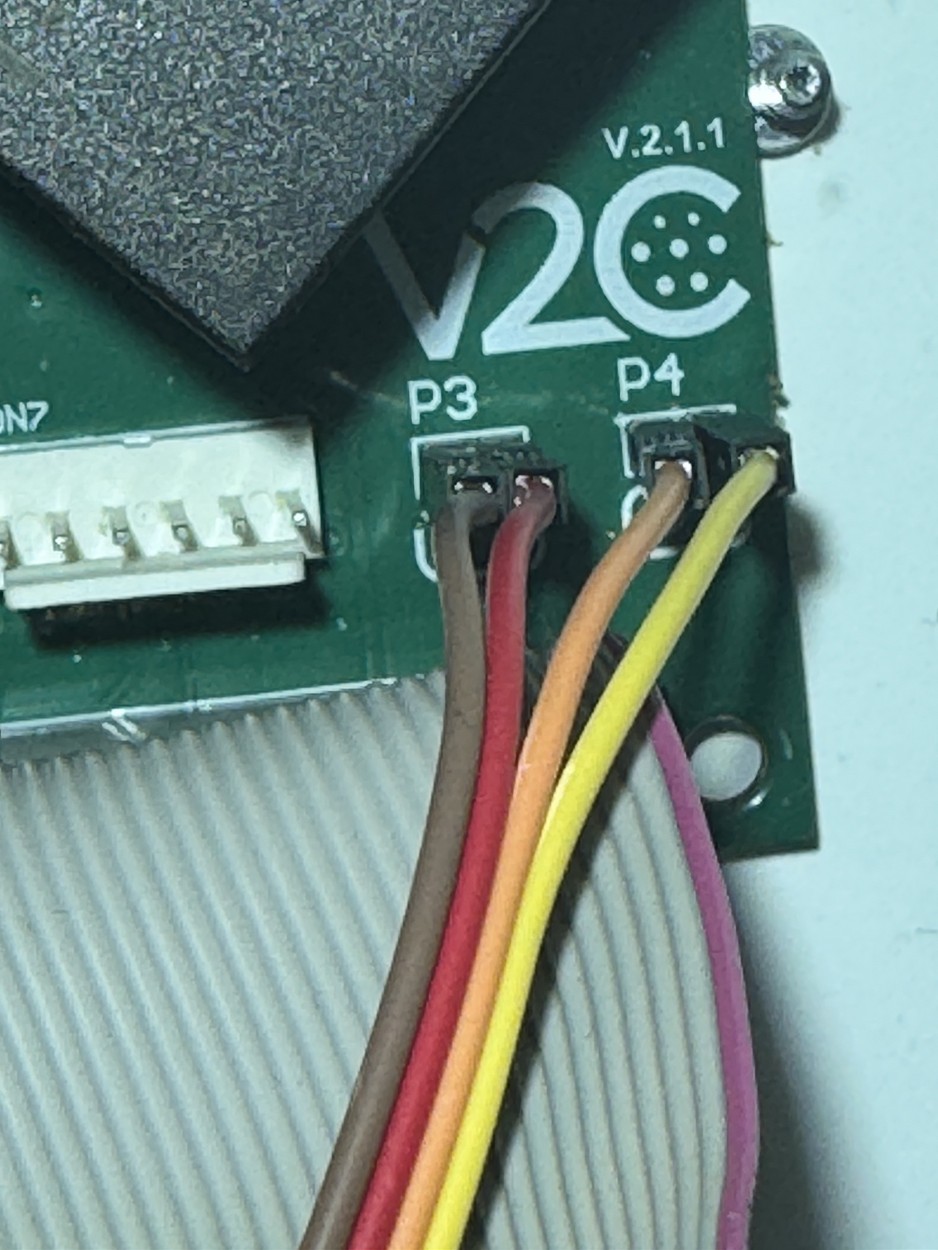
Access the inside of the charger and locate the P3 and P4 ports on the power board. If either of them has a jumper installed, you must remove it to connect the cables.
Plate A
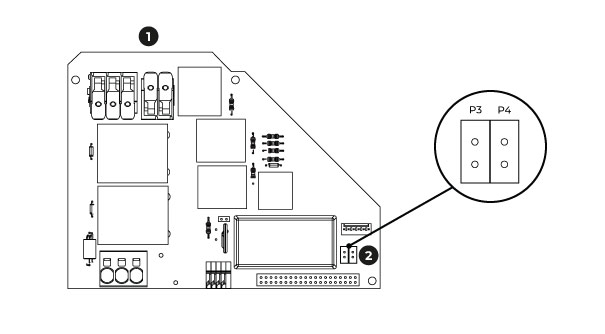
Plate B
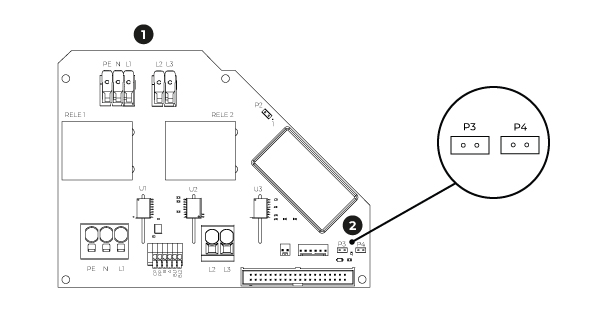

Power plate

Ports P3 and P4. Each port has two pins.
2. Connect the control board
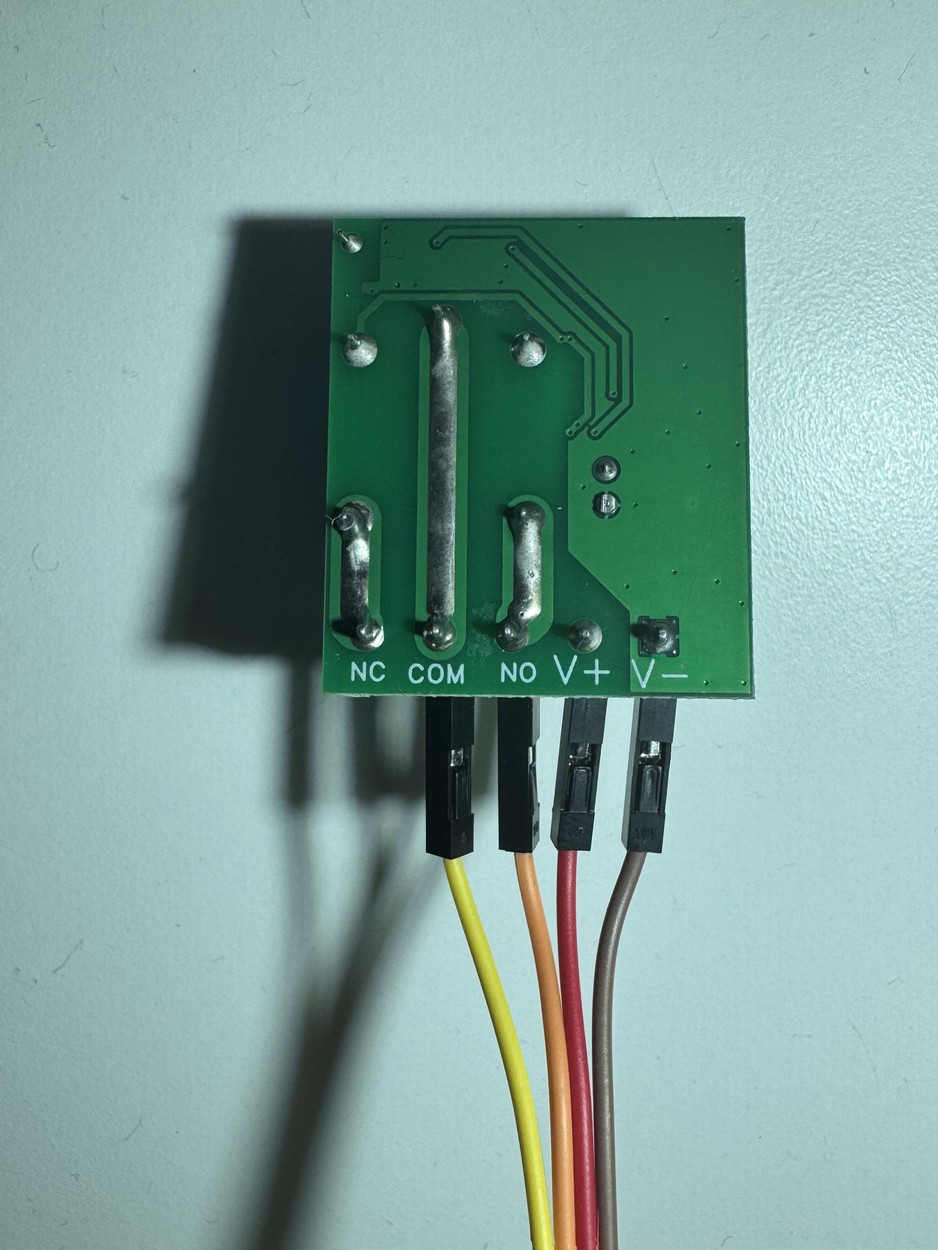
Next, you must connect the control board (receiver module) to the power board of Trydan. The receiver module consists of five 5 ports: NC, COM, NO, +VCC, -GND. Secure the connection following the diagram below:
Plate A
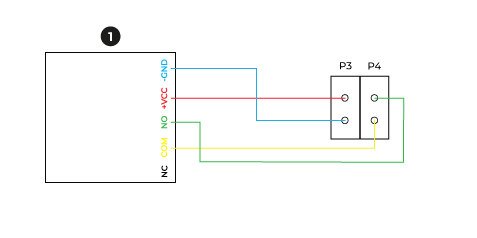
Plate B
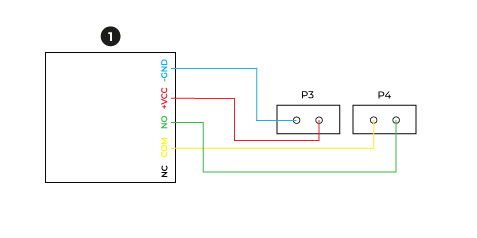
Rear reception module
3. Set up the remote control
Now that the receiver is installed and connected (steps 1 and 2), here’s what you need to do to make the remote turn your charger on and off. Explained step by step, without technical jargon.
What does this remote do? The receiver is a small device that is installed inside the charger. It receives the signal from your remote control (like a car remote) and activates an internal switch that turns the charger on or off. In summary: you press a button on the remote → the receiver detects it → the charger turns on or off, depending on the press.
Before you start you need: the receiver already installed and connected inside the charger (previous steps 1 and 2) · the remote control, with batteries · and about 5 minutes, without rush.
The parts you are going to use. On the receiver, there is a small white button that is used to activate the remote memorization, and a light (LED) next to it, which stays on steadily when the receiver is ready to memorize the remote.
This is the receiver
Connection in P3 and P4
This part is already done by the installer in steps 1 and 2.
How to add a new remote. Follow these steps in order and without rushing:
Press the white button on the receiver twice. The light (LED) will stay on solid.
In the next 3 to 5 seconds, press the button you want to use on the remote (A or B: either one works).

The light will blink for a moment and then turn off: the remote has been saved in the receiver’s memory.

Check that it works: press the remote button and listen for a small “click” inside the receiver. The charger will turn on or off.
Useful information. Some remotes, instead of buttons A and B, have a drawing of an open lock and a closed lock: they work the same way, either button will do. If you want to program the remote again (for example, a new one), repeat step 1.
Final check. Before finishing the job, check these three things: that the receiver has power, that when pressing the remote you hear the “click” of the relay, and that the charger truly turns on and off when pressing the remote. Repeat the test once everything is in its final position, inside the already closed charger: being very close to other metal parts can sometimes reduce the remote’s range.
If something is not working:
| What’s happening? | What can you try? |
|---|---|
| The light doesn’t turn on when pressing the white button | The board may not be receiving power correctly. Check the connections in steps 1 and 2. |
| The remote doesn’t get saved | Repeat the steps above and press the remote button within the first 3-5 seconds, without waiting longer. |
| I press the remote and nothing happens | Check the remote’s battery and get closer to the charger. If it still doesn’t work, repeat the saving process. |
| You hear the click but the charger doesn’t turn on or off | The receiver is working fine; check the connection between the receiver and the power board (steps 1 and 2). |
Always remember (safety). Any work inside the charger or with 230 V cables must be done by a licensed installer or electrician. Before handling any cable, first disconnect the power. Do not bring water or moisture near the receiver or the control. If you have any doubts or something is not working as explained here, it is better to stop and contact Technical Support rather than continue trying.
Technical data sheet
| Radio frequency | 433 MHz |
| Power supply | 12 V DC (terminals V+ / V−) |
| Relay | JQC-3F(T73)-S-DC12V-CK |
| Contact capacity | 10 A / 250 VAC · 15 A / 125 VAC |
| Channels | 1 (one relay output) |
| Remote control | 2 buttons (A / B) |
NOTE: If you encounter issues with pairing, first check the connection and polarity before repeating the process.
Do you need technical support?
Resolve your issue instantly through our AI Chat. If it is not resolved, generate a request in the Technical Support Center and we will contact you as soon as possible to provide you with the best solution.