
Integration of the Turbo Energy/Deye Inverter with Trydan
Deye is an inverter manufacturer that also sells its product under the name of numerous brands to other companies, such as Turbo Energy (the most well-known in Spain), SunSynk, or Sol-Ark. This inverter is compatible with the Trydan charging point, allowing for maximum solar generation utilization. The connection can be made via cable (RS485-Modbus), the recommended option for being the most stable, or via WiFi (Modbus TCP) if the inverter has the SOLARMAN Stick Logger dongle. Since it is an inverter that works with batteries, the best way to connect is directly to the inverter.
The connection is made through the RS485-Modbus protocol. For this, we need to locate the Cable A and B of this protocol.

Tabla de contenidos
- Preliminary step: identify the inverter
- Connection methods between Trydan and Turbo Energy/Deye
- Wired connection — Recommended
- Connection diagrams
- Types of connection
- Connection SUN-12/14/16K-SG01-LP1-EU
- Connection SUN-5/6/7.6/8/10/12-SG02-LP1-EU
- Connection SUN-3.6/5/6-SG02-LP1-EU
- Connection SUN-14/15/16/18/20k-SG05LP3-EU
- Connection SUN-5/6/8/10/12/15/20/25/29.9/30/35/40/50K-SG01HP3-EU-BM3/4
- Connection SUN-3.6/5/6/7.6/8/10-SG05LP1-EU-AM2-P
- Connection SUN-3.6/5/6/7.6/8K-SG05LP1-EU
- TURBO ENERGY HYBRID SERIES 48V 5.0 Connection
- Connection SUN-5/6/8/10/12K-SG04LP3-EU
- Types of connection
- WiFi Connection
- Compatible Models
- Do you need technical support?
Preliminary step: identify the inverter
- Locate the model label. It is on the side of the inverter. Write down the full reference (for example, SUN-12K-SG04LP3-EU).
- Check compatibility. Look for the model in the compatible models table. The table also indicates which x10 multipliers need to be activated in the V2C app.
- Identify the communication port. Check the connection panel of the inverter and locate the RS485 port that corresponds to your model. If you have any doubts, consult the manufacturer’s manual at deyeinverter.com/product.
| Deye Model | Port to Use |
|---|---|
| SUN-12/14/16K-SG01LP1-EU | BMS 485/CAN |
| SUN-5/6/7.6/8/10/12K-SG02LP1-EU | BMS 485/CAN |
| SUN-3.6/5/6K-SG02LP1-EU | RS485 |
| SUN-14/15/16/18/20K-SG05LP3-EU | BMS 485/CAN or Modbus |
| SUN-5…50K-SG01HP3-EU-BM3/4 | RS485 |
In all models, line A is on pins 2 and 7 and line B is on pins 1 and 8 of the selected port. In the section Types of connection you have the image of the panel for each model.
Connection methods between Trydan and Turbo Energy/Deye
There are two main ways to connect the Trydan charger to a Turbo Energy/Deye inverter:

Wired connection — Recommended

Wired connection using the RS485/Modbus protocol
The wired connection using the RS485/Modbus protocol is the recommended option for integrating the Turbo Energy/Deye inverter with the Trydan charger, as it is the most stable. Alternatively, you can use Modbus TCP over WiFi through the inverter’s Solarman dongle (section B). Below you will find all the compatible inverter models with their corresponding A/B pinout, the installation video, the physical wiring to the Trydan, and the configuration steps in the V2C Cloud app.
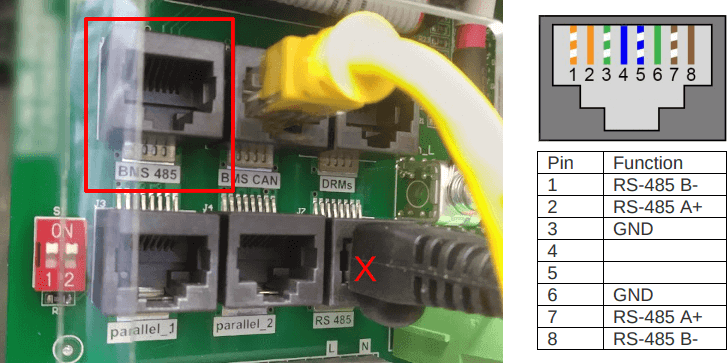
There are different models depending on the year of manufacture, all included in the DEYE manual. In all of them, line A is on pins 2 and 7 and line B on pins 1 and 8 of the RS485 or BMS 485/CAN port; we use pins 7 (A+) and 8 (B−).
Battery connected to the same port: if the BMS 485/CAN port is already occupied by the battery (connected via CAN), use the meter (Meter / Modbus) port of the inverter. You have the process in the video “Installation with Deye inverter on the same battery port”.
Real example: control board of the Trydan and panel of an older Deye inverter. In this model, the BMS 485 port is used, which works exactly like the RS485 port. A will be pin 7 and B will be pin 8.

Wired connection to the Trydan charging point
Safety: the opening of the charger and the inverter, and any work inside, must be done only by authorized installers, with the equipment de-energized.
The Trydan supports two connection methods. In both cases, the pins 7 (A+) and 8 (B−) of the RS485 port of the inverter are used.
Option 1: RJ45 connector from the Trydan control board.
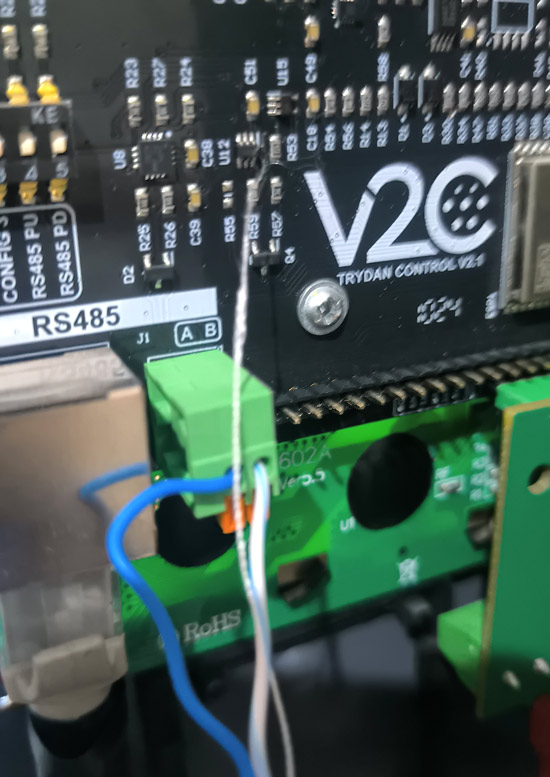
Option 2: terminals A and B of the control board (chargers manufactured since mid-2024).
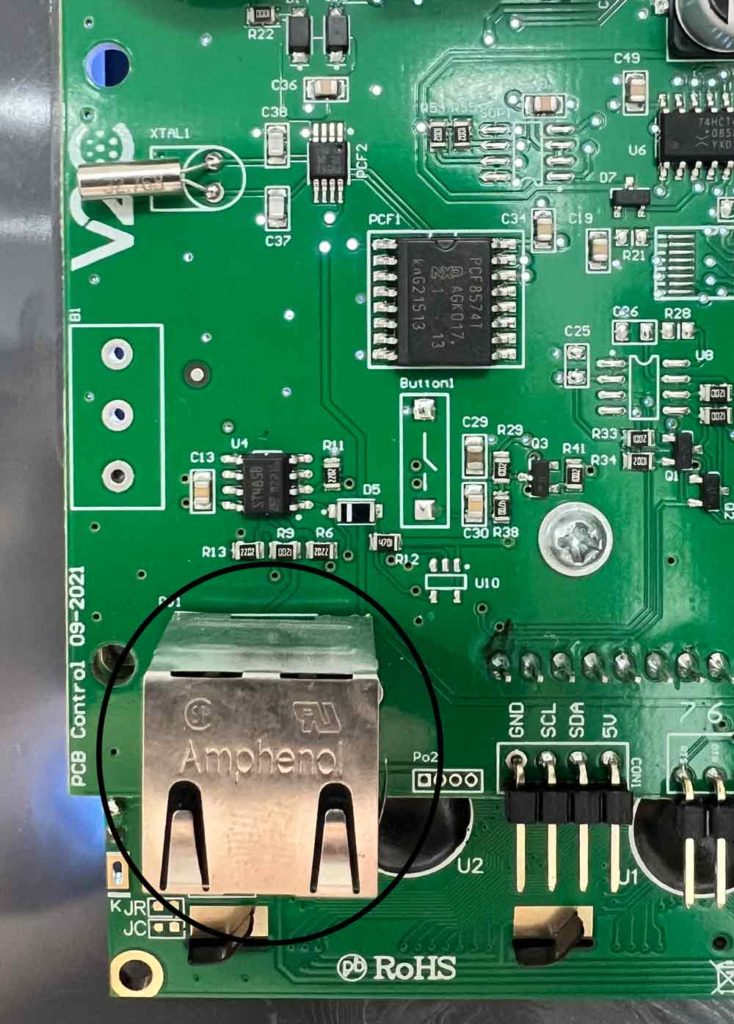
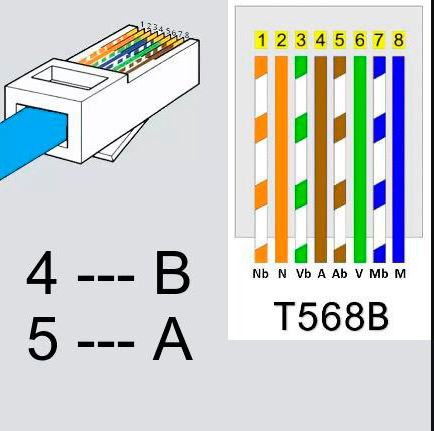
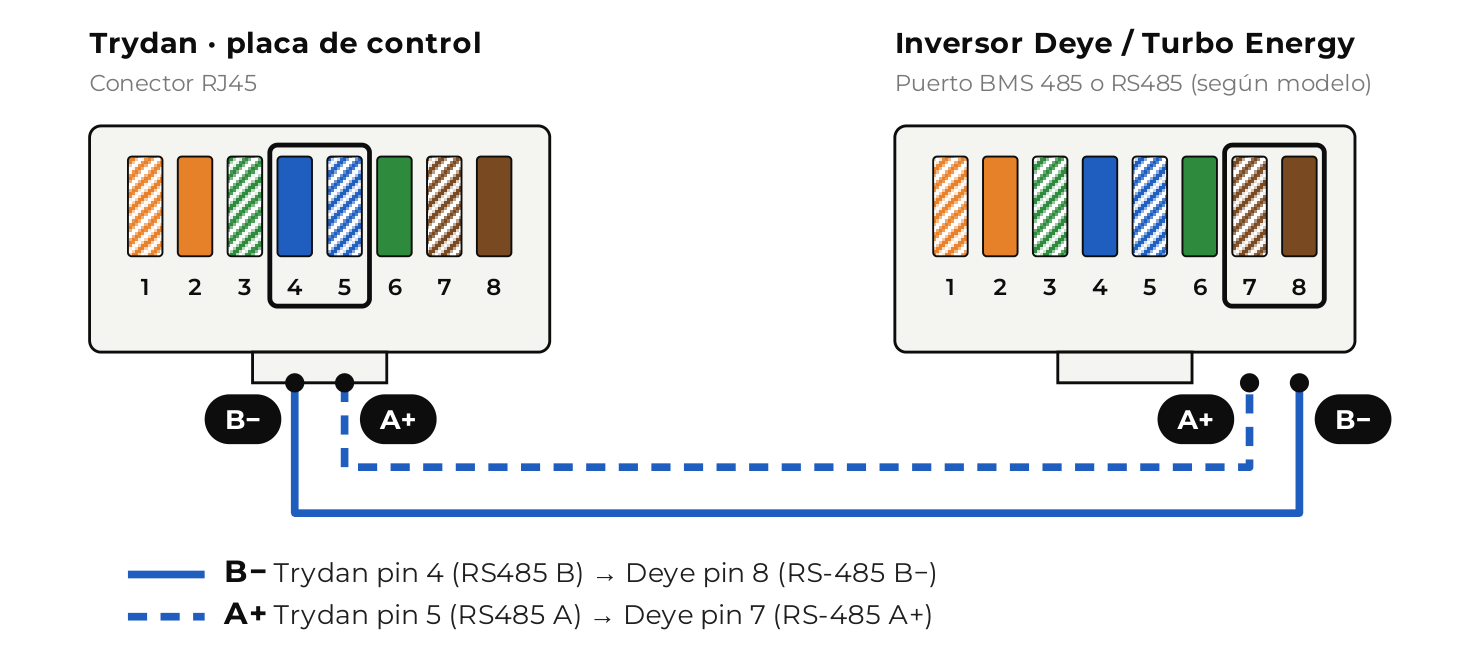
Option 1 · Connection via RJ45. Use a UTP cable with RJ45 on both ends. The cable is custom-made: the pins do not match on both sides, so a standard network patch cable will not work. Only two wires are used; the rest are not utilized:
- B: pin 4 of the Trydan (RS485 B) → pin 8 of the inverter (RS-485 B−)
- A: pin 5 of the Trydan (RS485 A) → pin 7 of the inverter (RS-485 A+)
Option 2 · Terminals A and B. In chargers manufactured since mid-2024, you can connect the lines directly to the terminals A and B of the control board; their names are printed on the board. The wire from pin 7 of the inverter goes to terminal A and the one from pin 8 goes to terminal B.
Connection diagrams
Option 1 · Connection via RJ45
Option 2 · Connection to terminals A and B of the control board
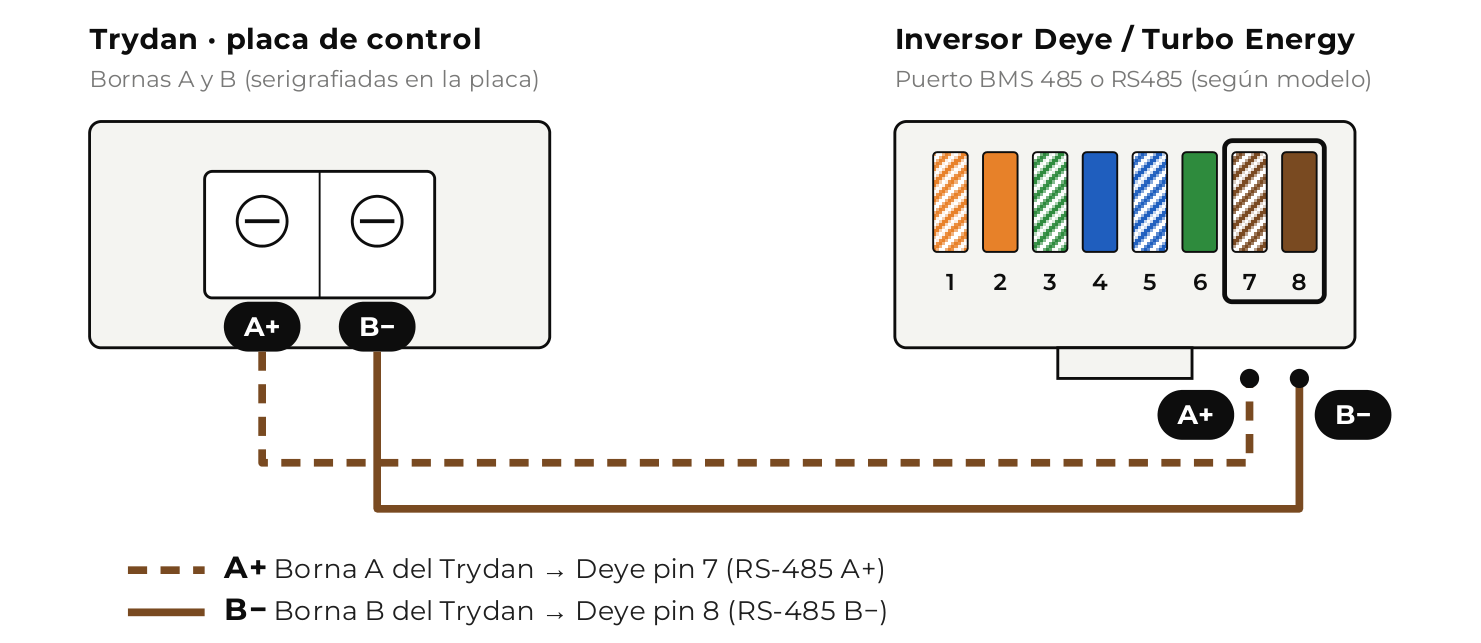
In the diagram, the brown and white-brown wires correspond to an RJ45 crimped according to the T568B standard, just as an example. The important thing is that the wire from pin 7 reaches terminal A and the one from pin 8 reaches terminal B.
Once the physical connection is made, scroll down this page to the ‘Mandatory Step – Configuration in the V2C Cloud app’ to adjust the necessary parameters that ensure its proper functioning.
Types of connection
Connection SUN-12/14/16K-SG01-LP1-EU
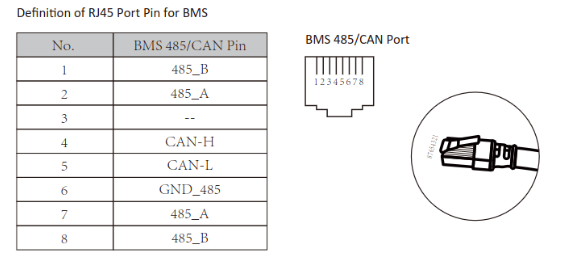
The RS485 communication (lines A and B) is carried out through the pins 1 and 2, and 7 and 8 of the BMS 485/CAN port, where line A corresponds to pins 2 and 7, and line B to pins 1 and 8.
Connection SUN-5/6/7.6/8/10/12-SG02-LP1-EU
You can communicate through the A and B lines using the pins 1 and 2, and 7 and 8 of the BMS 485/CAN port, where the A line corresponds to the pins 2 and 7, and the B line to the pins 1 and 8.
Connection SUN-3.6/5/6-SG02-LP1-EU
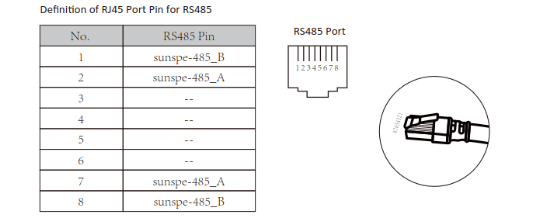
You can connect the lines A and B using the pins 1 and 2, and 7 and 8 of the RS485 port, where line A corresponds to pins 2 and 7, and line B to pins 1 and 8.
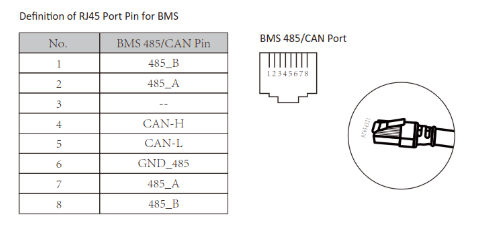
You can connect line A and B using pins 1 and 2, and 7 and 8 of the BMS 485/CAN port, where line A corresponds to pins 2 and 7, and line B to pins 1 and 8.
Connection SUN-14/15/16/18/20k-SG05LP3-EU
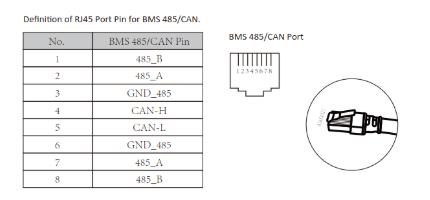
Communication via the A and B lines is carried out through the pins 1 and 2, and 7 and 8 of the BMS 485/CAN port, where the line 485_A corresponds to the pins 2 and 7, and the line 485_B to the pins 1 and 8.
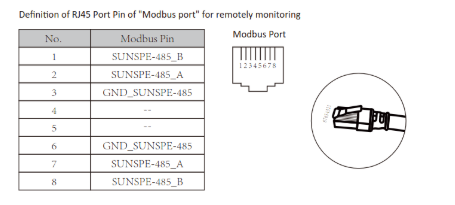
Communication via the A and B lines is carried out through the pins 1 and 2, and 7 and 8 of the Modbus port, where the SUNSPE-485_A line corresponds to pins 2 and 7, and the SUNSPE-485_B line to pins 1 and 8.
Connection SUN-5/6/8/10/12/15/20/25/29.9/30/35/40/50K-SG01HP3-EU-BM3/4
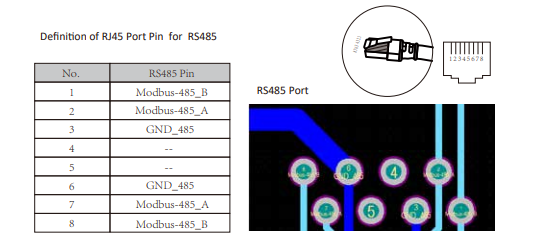
You can communicate lines A and B through pins 1 and 2, and 7 and 8 of the RS485 port, where Modbus-485_A line corresponds to pins 2 and 7, and the Modbus-485_B line to pins 1 and 8.
Connection SUN-3.6/5/6/7.6/8/10-SG05LP1-EU-AM2-P
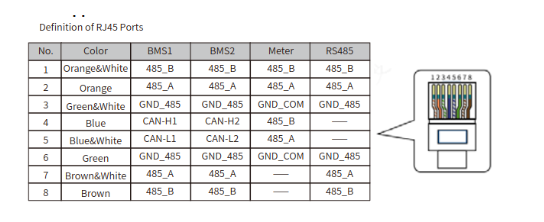
Lines A and B are available on pins 1 and 2, and 7 and 8 of the BMS1, BMS2, and RS485 ports, and on pins 1 and 2, and 4 and 5 of the Meter port.
The BMS 485/CAN port has lines A and B on pins 1 and 2, and 7 and 8. The A line is located on pins 2 and 7, and the B line on pins 1 and 8.
Connection SUN-3.6/5/6/7.6/8K-SG05LP1-EU
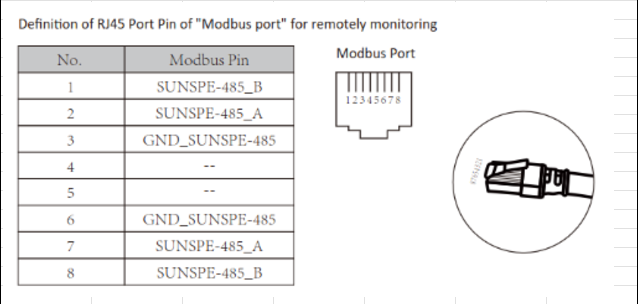
Communication via the A and B lines is carried out through the pins 1 and 2, and 7 and 8 of the Modbus port, where the SUNSPE-485_A line corresponds to the pins 2 and 7, and the SUNSPE-485_B line to the pins 1 and 8.
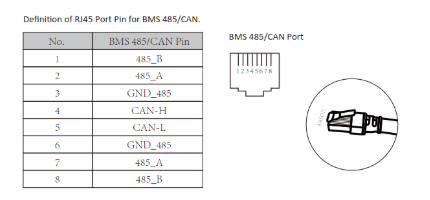
Communication via the A and B lines is carried out through the pins 1 and 2, and 7 and 8 of the BMS 485/CAN port, where the line 485_A corresponds to the pins 2 and 7, and the line 485_B to the pins 1 and 8.
TURBO ENERGY HYBRID SERIES 48V 5.0 Connection
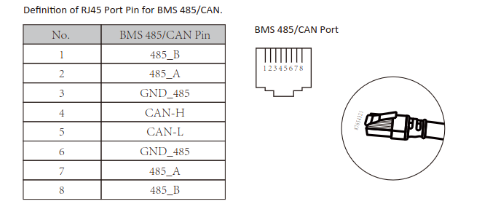
Communication via the A and B lines is carried out through the pins 1 and 2, and 7 and 8 of the BMS 485/CAN port, where the line 485_A corresponds to the pins 2 and 7, and the line 485_B to the pins 1 and 8.
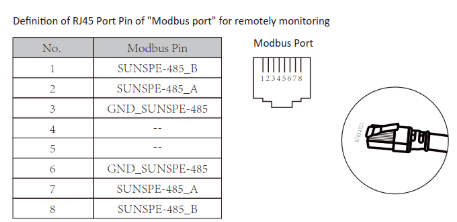
Communication via the A and B lines is carried out through the pins 1 and 2, and 7 and 8 of the Modbus port, where the SUNSPE-485_A line corresponds to pins 2 and 7, and the SUNSPE-485_B line to pins 1 and 8.
Connection SUN-5/6/8/10/12K-SG04LP3-EU
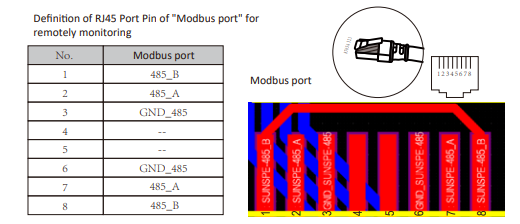
Communication via the A and B lines is carried out through the pins 1 and 2, and 7 and 8 of the Modbus port, where the line 485_A corresponds to the pins 2 and 7, and the line 485_B to the pins 1 and 8.

WiFi Connection
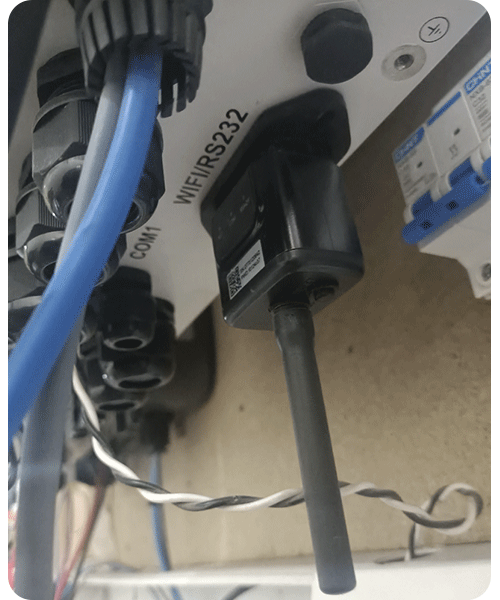
You can use the Modbus TCP option if you have the Solarman Stick Logger LSW-3 or LSW-5 dongle, which connects to the inverter via RS-232, providing connection to it through WiFi.
The connection to the dongle is made via local WiFi. Both devices must be connected to the same local network.
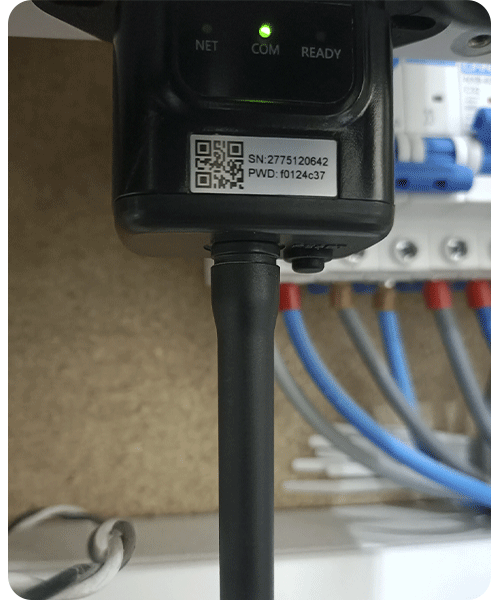
You need to indicate the IP and the S/N of the Stick Logger in the dynamic power control settings in the free V2C Cloud app. To do this, scroll down this page to the ‘Mandatory Step – Configuration in the V2C Cloud app’ to find out how to proceed.
Compatible Models
These are the model references Deye / Turbo Energy integrated with Trydan that work correctly, with a description of which x10 multipliers should be activated in the V2C app in each case to calibrate the measurements with those of the inverter.
| MODEL | TYPE DEYE / TURBO ENERGY | Grid Power x 10 | Battery Power x 10 | PV Power x 10 |
|---|---|---|---|---|
| TURBO ENERGY HYBRID SERIES 48V 5.0 | MONO | NO | NO | NO |
| SUN-6K-SG03LP1-EU | MONO | NO | NO | NO |
| SUN-3.6K-SG05LP1-EU-AM2-P | MONO | NO | NO | NO |
| SUN-6K-SG05LP1-EU-AM2-P | MONO | NO | NO | NO |
| SUN-8K-SG01LP1-EU | MONO | NO | NO | NO |
| SUN-6K-SG05LP1-EU | MONO | NO | NO | NO |
| SUN-5K-SG03LP1-EU | MONO | NO | NO | NO |
| SUN-8K-SG04LP3-EU | TRI | NO | NO | NO |
| SUN-12K-SG04LP3-EU | TRI | NO | NO | NO |
| SUN-15K-SG05LP3-EU-SM2 | TRI | NO | NO | NO |
| SUN-6K-SG04LP3-EU | TRI | NO | NO | NO |
| SUN-12K-SG01HP3-EU-AM2 | TRI | NO | YES | YES |
| SUN-15K-SG01HP3-EU-AM2 | TRI | NO | YES | YES |
| SUN-20K-SG01HP3-EU-AM2 | TRI | NO | YES | YES |
| SUN-30K-SG01HP3-EU-BM3 | TRI | NO | YES | YES |
| SUN-12K-SG02LP1-EU-AM3 | MONO | YES | NO | NO |
| SUN-10K-SG02LP1-EU-AM3-P | MONO | YES | NO | NO |
| SUN-14K-SG01-LP1-EU | MONO | YES | NO | NO |
| SUN-10K-SG02LP1-EU-AM3 | MONO | YES | NO | NO |
| SUN-20K-SG05LP3-EU-SM2 | TRI | YES | NO | NO |
This step is mandatory for both types of connection, whether by cable or WiFi. Without this configuration, the equipment will not be able to properly manage the available power or optimize the charging.
1. In the inverter
- Assign the communication address = 1.
- Select the «Slave» mode.
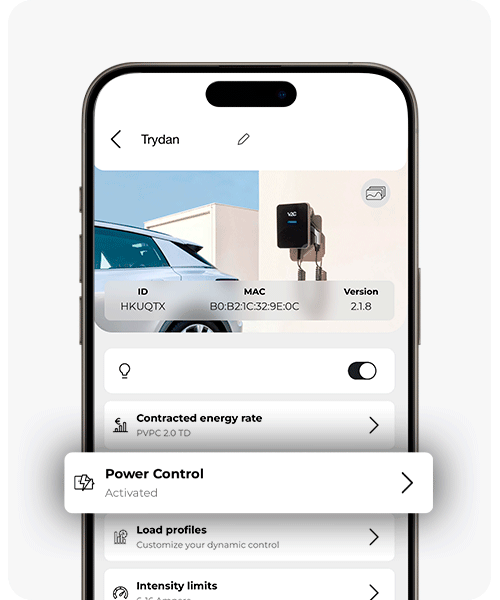
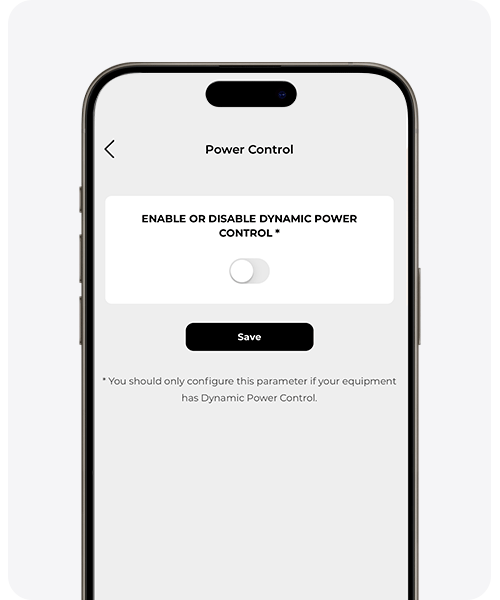
2. In the V2C Cloud app (wired connection)
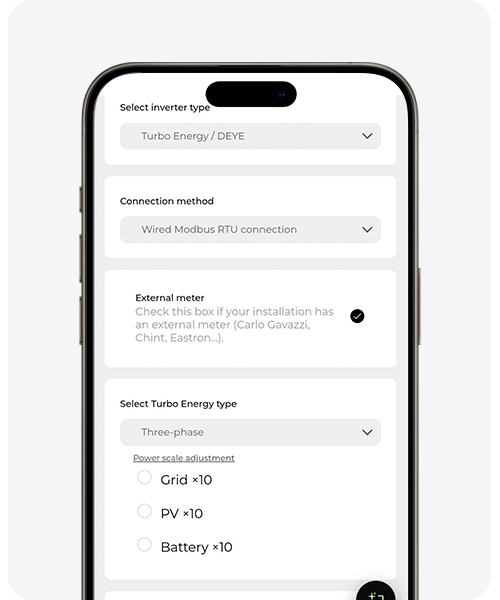
Set up the dynamic power control from V2C Cloud (mobile app or web). Use the second to last image as a reference:
- Indicates if the inverter has an external meter.
- Select the type of inverter: single-phase or three-phase.
- Activate the multipliers x10 (Grid Power, Battery Power, PV Power) according to the compatible models table, so that the inverter measurements match those of the charger.
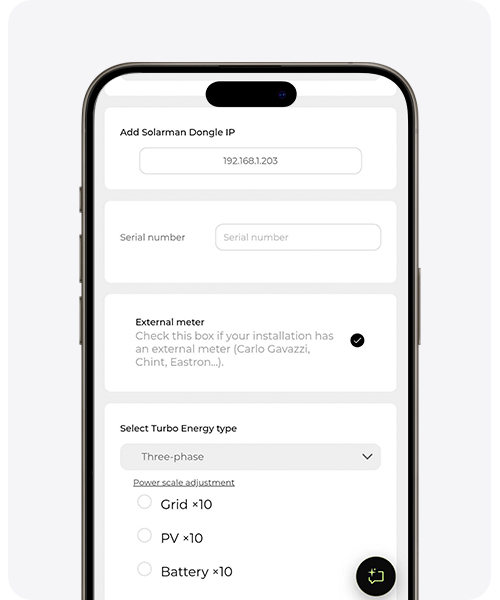
3. WiFi Alternative (Solarman LSW-3 / LSW-5 dongle)
Use the last image as a reference. The Trydan and the dongle must be connected to the same local network. In the app, enter:
- The IP of the dongle. You can check it in two ways:
– Connect to the device’s WiFi network (AP_xxxxxxxx) using the PSW key from the label, then enter 10.10.100.254 in your browser (username admin, password admin) and locate the address in Quick Set > IP Address.
– From a mobile phone, tablet, or computer in the home, go to the router settings and look for the IP of the Solarman dongle in DHCP or Connected Devices. - The serial number (SN) of the Stick Logger, which appears on its label. It is mandatory: without it, communication between the Trydan and the inverter cannot be established.
If you do not yet have an account on V2C Cloud or have questions about how the app works, check the V2C Cloud setup guide.
Do you need technical support?
Resolve your issue instantly through our AI Chat. If it is not resolved, generate a request in the Technical Support Center and we will contact you as soon as possible to offer you the best solution.